
Although the Windows 7 desktop is a great place for permanent shortcuts such as My Computer and the Recycle bin, there are times when it is best to hide and disable all items on the Desktop.
These times include when administrating a public computer or a computer setup for a specific purpose such as a demonstration. Learn how to hide and disable all items on the Windows 7 Desktop.
Not all PCs are used in home and office settings. Administrators of public and kiosk computers face very different challenges when it comes to making sure users have easy access to applications. One of the challenges is ensuring the users have a clean slate after other users have stepped away from the computer.
Windows 7 is an excellent platform for public PCs because it is secure and easily maintained. One feature the public computer administrators often use is the one that hides and disables all desktop items.
Using this feature, administrators need not worry that the actions of one user affect the PC’s usability for subsequent users. A Local Group Policy change ensures that the desktop is locked down and unusable.
Type gpedit.msc into the Run dialogue box and click the OK button. If you don’t have the Run command on your Start menu, you can alternatively hold down the Windows key on your keyboard and press the R key.
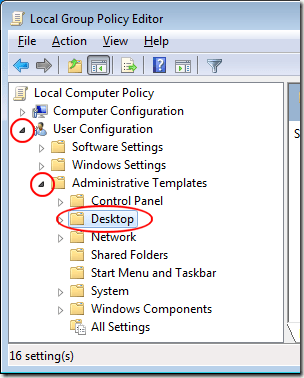
You should now be looking at the Local Group Policy Editor window. In the left hand pane of the window, click on User Configuration>Administrative Templates>Desktop. Be sure to click on the Desktop folder itself and not the arrow that expands it.
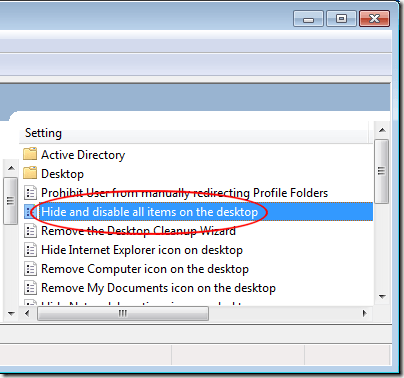
In the right hand pane, locate an entry titled Hide and Disable All Items on the Desktop. Double click this entry to edit it.
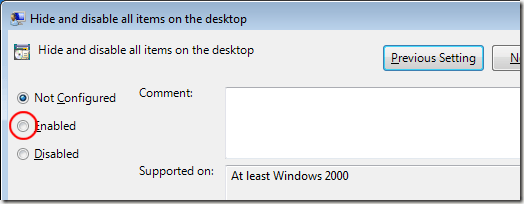
You should now be looking at the Hide and Disable All Items on the Desktop window. If you or anyone else has never adjusted this policy, the current option should be Not Configured. Click on the Enabled button, click the OK button, and close any windows that remain open. The policy will take effect once you log out and log in or restart the PC.
Some administrators struggle to create a uniform computing experience for users of public PCs or kiosks. One trick is to hide and disable all items on the Windows 7 desktop to prevent users from changing the desktop’s contents or dragging items to the Recycle Bin.
Keep in mind that this change does not prevent users from accessing the files and programs that were represented by the shortcuts residing on the desktop. Many of these features are accessible from the Start menu. Hiding and disabling the items on the desktop does, however, create a tidy appearance for demonstration purposes.
These times include when administrating a public computer or a computer setup for a specific purpose such as a demonstration. Learn how to hide and disable all items on the Windows 7 Desktop.
Why Hide and Disable Items on the Desktop?
Not all PCs are used in home and office settings. Administrators of public and kiosk computers face very different challenges when it comes to making sure users have easy access to applications. One of the challenges is ensuring the users have a clean slate after other users have stepped away from the computer.
Windows 7 is an excellent platform for public PCs because it is secure and easily maintained. One feature the public computer administrators often use is the one that hides and disables all desktop items.
Using this feature, administrators need not worry that the actions of one user affect the PC’s usability for subsequent users. A Local Group Policy change ensures that the desktop is locked down and unusable.
Hiding and Disabling Items on the Windows 7 Desktop
The changes you are about to make will affect all users of the PC. To make these changes, you must have access to an account that has administrative privileges. Log in to Windows 7 using an administrator account and click on Start>Run.Type gpedit.msc into the Run dialogue box and click the OK button. If you don’t have the Run command on your Start menu, you can alternatively hold down the Windows key on your keyboard and press the R key.
You should now be looking at the Local Group Policy Editor window. In the left hand pane of the window, click on User Configuration>Administrative Templates>Desktop. Be sure to click on the Desktop folder itself and not the arrow that expands it.

In the right hand pane, locate an entry titled Hide and Disable All Items on the Desktop. Double click this entry to edit it.

You should now be looking at the Hide and Disable All Items on the Desktop window. If you or anyone else has never adjusted this policy, the current option should be Not Configured. Click on the Enabled button, click the OK button, and close any windows that remain open. The policy will take effect once you log out and log in or restart the PC.

Some administrators struggle to create a uniform computing experience for users of public PCs or kiosks. One trick is to hide and disable all items on the Windows 7 desktop to prevent users from changing the desktop’s contents or dragging items to the Recycle Bin.
Keep in mind that this change does not prevent users from accessing the files and programs that were represented by the shortcuts residing on the desktop. Many of these features are accessible from the Start menu. Hiding and disabling the items on the desktop does, however, create a tidy appearance for demonstration purposes.
No comments:
Post a Comment