
There are many Linux distributions available. Ubuntu, Fedora, OpenSUSE, Debian, RedHat, the list goes on and on. In many cases, however, what may differentiate one distribution from another (at least for the casual user), is the desktop environment. Some distributions use GNOME, others use KDE, and many distributions aimed at older or computers with less “oomph” will use the Xfce desktop environment.
Ubuntu users wanting to use Xfce have the option of using Xubuntu. For someone switching betwen desktop environments, some actions are the same, while others differ slightly. One of the things Xfce does slightly differently is the editing of application launchers housed on the panel. This article will take you step by step through both adding an application launcher to the panel, and then editing it.
You can also add your launcher another way. Here’s how:
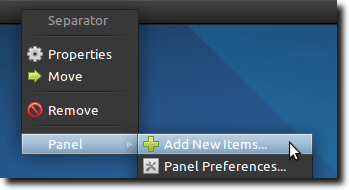
The first step is to right-click on the panel, and choose the Add New Items option from the panel submenu.
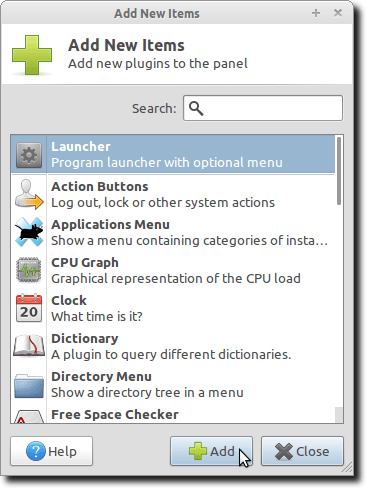
A new window, titled Add New Items will appear. Scroll through the list of options, and select the item you want. If you’re simply wanting to add a new application launcher, that option is already at the top (at least in Xubuntu), titled Launcher. Highlight it and click the Add button at the bottom.
You’ll see a new launcher icon appear in the panel, although it doesn’t yet have an application associated with it. When you’re finished adding items (now is a good time to add a new launcher for every application you want in the panel), close the Add New Items window.
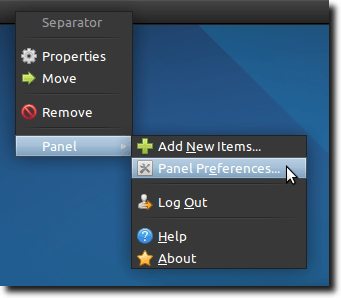
Once again, right-click on the panel, but instead of choosing the Add New Items option from the panel submenu, choose the Panel Preferences option.
This window will appear.
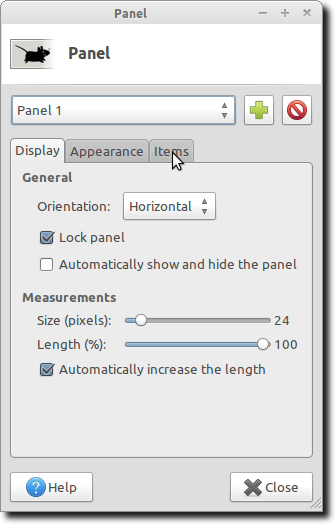
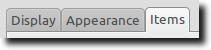
To edit our existing launchers (or to add more, if you like), click the Items tab.
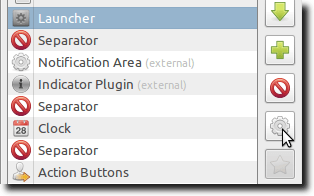
Now, find the launcher you want to edit, select it and hit the button below the delete button to edit it. You could also double-click it.
Note: depending on your icon set, the icons may look slightly different from those shown.
After opening the Launcher properties window, you’ll either see an empty space (if the launcher was newly created), or an application already there. The neat thing about Xfce launchers is that they can contain multiple applications.
So if you want a little drawer of programs, you could simply add more applications to the launcher. But if you like having one launcher per program, then simply click the Delete button (if there’s already an application present that you want to change), and the Add button to add one.
A new window will appear when you add an application.
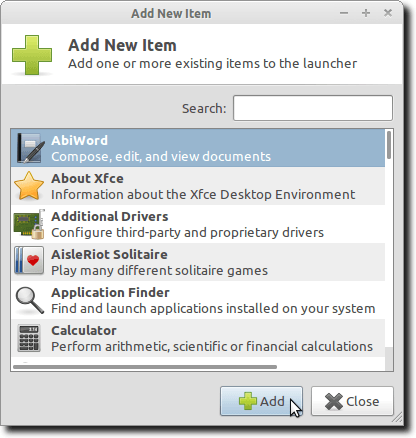
Select the application you want and click Add. Repeat the process if you want multiple applications per launcher. When you’re finished, simply close all the launcher and panel preference windows and you’re done!
Note: If you want to reorder the launchers, right-click, choose the move option, then drag your mouse to the left or right. Or, return to the Panel Preferences, select the launcher you want to move, and use the up and down arrows to reposition it in your list of panel items.
Ubuntu users wanting to use Xfce have the option of using Xubuntu. For someone switching betwen desktop environments, some actions are the same, while others differ slightly. One of the things Xfce does slightly differently is the editing of application launchers housed on the panel. This article will take you step by step through both adding an application launcher to the panel, and then editing it.
Adding an Application Launcher.
There are a couple different ways to add applications to the panel. The first, and simplest (and most like GNOME), is to open the Applications menu, find the item you want, click it, and drag it to the panel. Simple. Easy.You can also add your launcher another way. Here’s how:
The first step is to right-click on the panel, and choose the Add New Items option from the panel submenu.
A new window, titled Add New Items will appear. Scroll through the list of options, and select the item you want. If you’re simply wanting to add a new application launcher, that option is already at the top (at least in Xubuntu), titled Launcher. Highlight it and click the Add button at the bottom.
You’ll see a new launcher icon appear in the panel, although it doesn’t yet have an application associated with it. When you’re finished adding items (now is a good time to add a new launcher for every application you want in the panel), close the Add New Items window.
Editing Application Launchers
Now that we’ve added our launchers (even if they don’t yet “know” what programs to launch), we can begin editing them. These are also the steps to follow if you have application launchers already on your panel, but want to edit them.Once again, right-click on the panel, but instead of choosing the Add New Items option from the panel submenu, choose the Panel Preferences option.
This window will appear.
To edit our existing launchers (or to add more, if you like), click the Items tab.
Now, find the launcher you want to edit, select it and hit the button below the delete button to edit it. You could also double-click it.
Note: depending on your icon set, the icons may look slightly different from those shown.
After opening the Launcher properties window, you’ll either see an empty space (if the launcher was newly created), or an application already there. The neat thing about Xfce launchers is that they can contain multiple applications.
So if you want a little drawer of programs, you could simply add more applications to the launcher. But if you like having one launcher per program, then simply click the Delete button (if there’s already an application present that you want to change), and the Add button to add one.
A new window will appear when you add an application.
Select the application you want and click Add. Repeat the process if you want multiple applications per launcher. When you’re finished, simply close all the launcher and panel preference windows and you’re done!
Note: If you want to reorder the launchers, right-click, choose the move option, then drag your mouse to the left or right. Or, return to the Panel Preferences, select the launcher you want to move, and use the up and down arrows to reposition it in your list of panel items.
No comments:
Post a Comment