We have previously written about how to create a shortcut and a keyboard shortcut for quickly accessing the Safely Remove Hardware dialog box . If you often use the same external USB drive and you want to be able to quickly eject that specific drive, we found a freeware tool called USB Disk Ejector. We downloaded and tried a beta version that has more features than the latest release. It seemed to work fine, so we recommend you try it.
This two-part post shows you how to use USB Disk Ejector to eject your USB device using either the graphical user interface (GUI) or the command line and how to set up shortcuts with shortcut keys for quicker ejection of your USB drives.
Download USB Disk Ejector from
http://quick.mixnmojo.com/usb-disk-eject-1-2-beta-4-last-beta-before-release-hopefully.
Unzip the file you downloaded.
The USB Disk Ejector dialog box displays. Select the USB device you want to eject and either double-click on it or press Enter to safely remove the device.
A message displays from the USB Disk Ejector system tray icon saying that the disk was ejected successfully. If there are no other USB devices connected to your system, a message saying, “No disks found.”, also displays in the USB Disk Ejector dialog box.
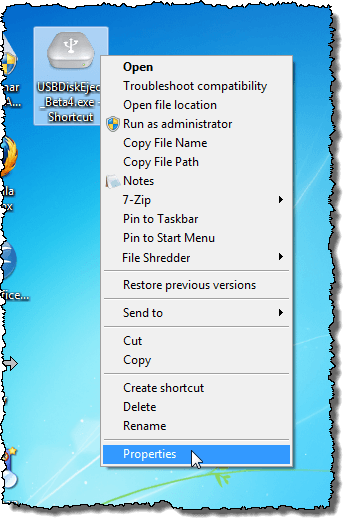
Once the shortcut is created, right-click on it and select Properties from the popup menu.
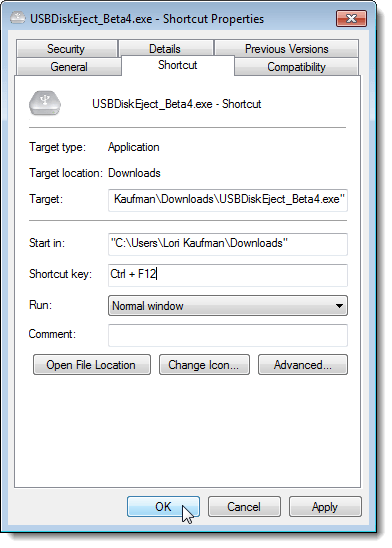
The Properties dialog box displays. On the Shortcut tab, click in the Shortcut key edit box. Press the key or key combination you want to use to open USB Disk Ejector. The keys are automatically entered into the edit box. Click OK.
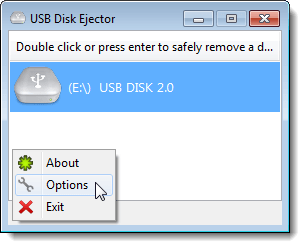
Select Options from the popup menu that displays.
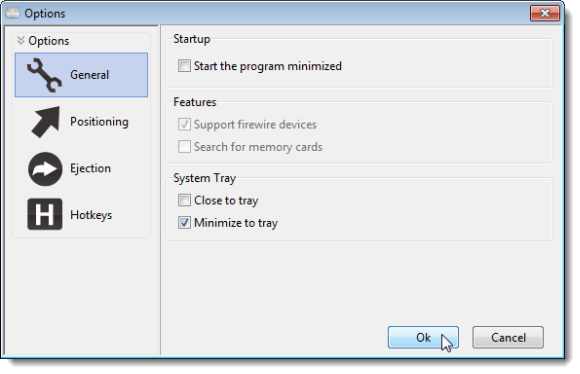
The Options dialog box displays. There are four buttons on the left side of the Options dialog box providing access to the different screens containing options. The General screen provides settings for Startup, Features, and System Tray. The version of USB Disk Ejector we used for this article is a beta version and the options in the Features section cannot be changed. You can choose to Start the program minimized in the Startup box and choose to Close to tray and Minimize to tray in the System Tray box.
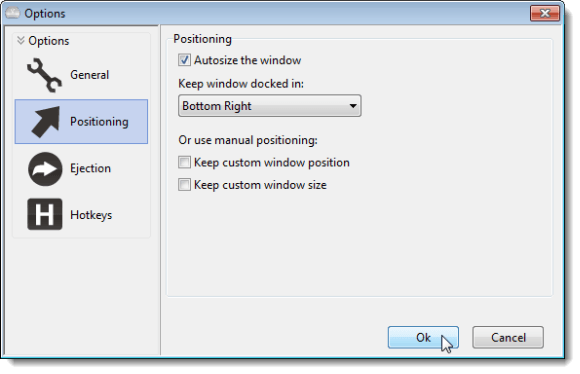
The Positioning screen provides options for customizing the default size and position of the USB Disk Ejector dialog box when it opens.
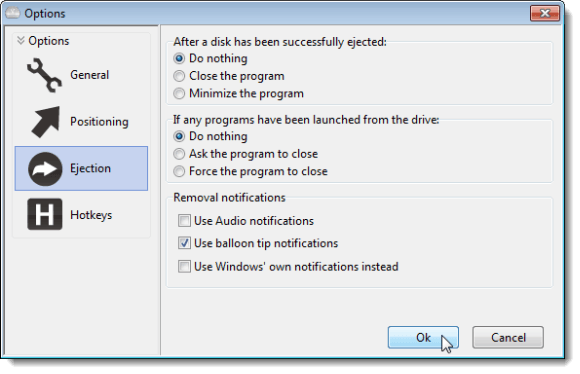
The Ejection screen allows you to specify what to do with the USB Disk Ejector dialog box After a disk has been successfully ejected. If you have programs open that you have run from the USB disk you are ejecting, you can tell USB Disk Ejector to Do nothing, Ask the program to close or Force the program to close by selecting one of these options in the If any programs have been launched from the drive box. Choose which notifications about USB disk removal you want to see by selecting the desired check boxes in the Removal notifications box.
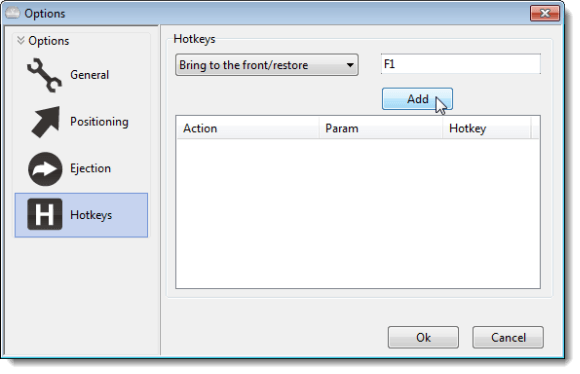
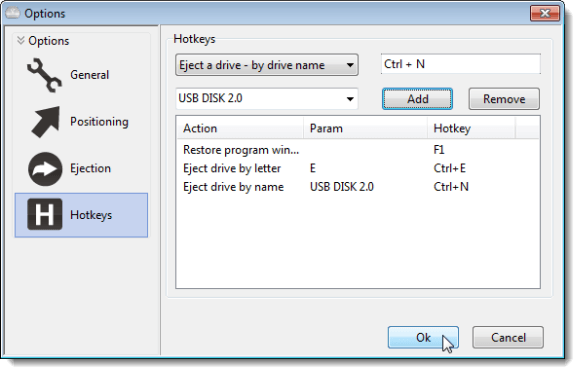
You can assign hotkeys to specific actions in USB Disk Ejector. For example, if you have a USB disk you use often and it always has the same drive letter when you connect it, you may want to be able to quickly disconnect it using a hotkey. To do this, click the Hotkeys button on the left side of the Options dialog box and then click the Add button on the Hotkeys screen.
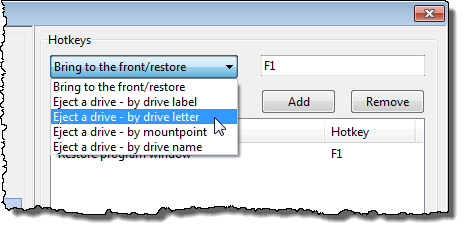
Select Eject a drive – by drive letter from the top drop-down list.
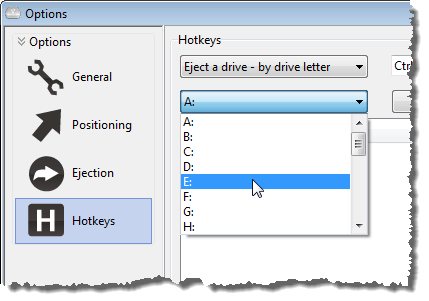
Select the drive letter for the USB disk you want to eject from the bottom drop-down list.
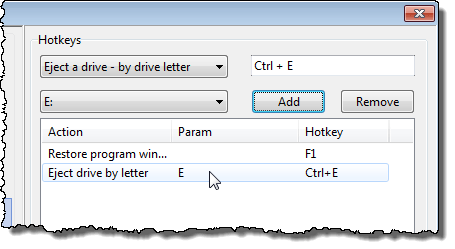
Put the cursor in the edit box to the right of the top drop-down list and press the key or key combination you want to use to eject the USB drive. Click Add. The action is added to the list.
NOTE: To use hotkeys defined in the USB Disk Ejector program, you must open USB Disk Ejector first. You can do this easily using the shortcut key you created for the desktop shortcut earlier in this post. We will show you later in this post how to create a shortcut on your desktop to eject a USB drive without having to open USB Disk Ejector first.
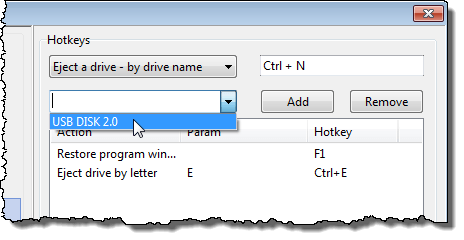
You can also choose to eject a drive by its name by selecting Eject a drive – by drive name, selecting the drive name, entering a key or key combination, and clicking Add.
Hotkeys are added to the list as you create them. Use the Remove button to delete any hotkeys you don’t want to use anymore.
NOTE: To change a hotkey you already created, you must first remove the hotkey and then recreate it. You cannot edit hotkeys.
In this post, we covered using the USB Disk Ejector GUI to eject a USB drive, creating a shortcut and a shortcut key to open USB Disk Ejector, and changing USB Disk Ejector options.
Stay tuned for Part II, where we will cover using the USB Disk Ejector command line to eject a USB drive and creating a shortcut for ejecting a USB drive by letter.
Welcome to the second part of this two-part series about using USB Disk Ejector to easily eject your USB devices and setting up shortcuts with shortcut keys for quicker ejection of your USB drives.
In Part I, we covered using the USB Disk Ejector GUI to eject a USB drive, creating a shortcut and a shortcut key to open USB Disk Ejector, and changing USB Disk Ejector options.
In this post, we are going to discuss using the USB Disk Ejector command line to eject a USB drive and creating a shortcut for ejecting a USB drive by letter.
Make sure you have downloaded and unzipped USB Disk Ejector prior to following the steps in this post. Also, we recommend you go through the steps in Part I before proceeding with the post.
Download USB Disk Ejector from
http://quick.mixnmojo.com/usb-disk-eject-1-2-beta-4-last-beta-before-release-hopefully.
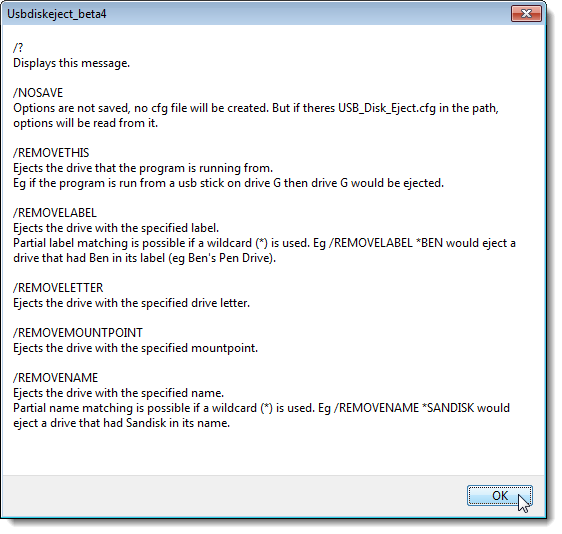
To view a list of commands available for USB Disk Ejector, enter the following line at the command prompt and press Enter.
A dialog box displays, listing all the options available for use with the USB Disk Ejector program on the command line. Click OK to close the dialog box.
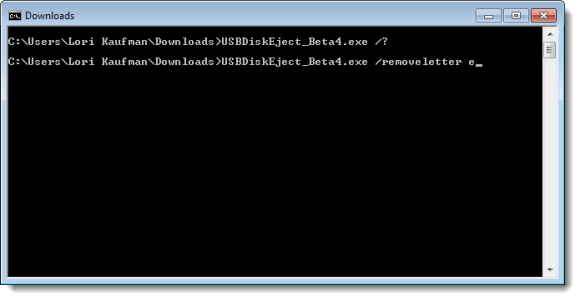
To eject a USB drive by letter using the command line (the same task you performed earlier in the GUI), enter the following line at the command prompt and press Enter.
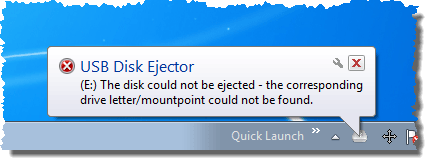
If you run the command for ejecting the same drive once it has already been ejected, the following error displays.
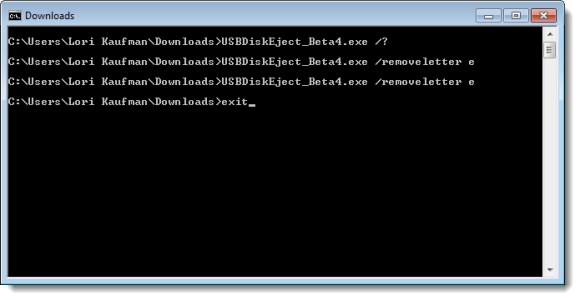
To close the command prompt window, enter “exit” (without the quotes) at the command line and press Enter.
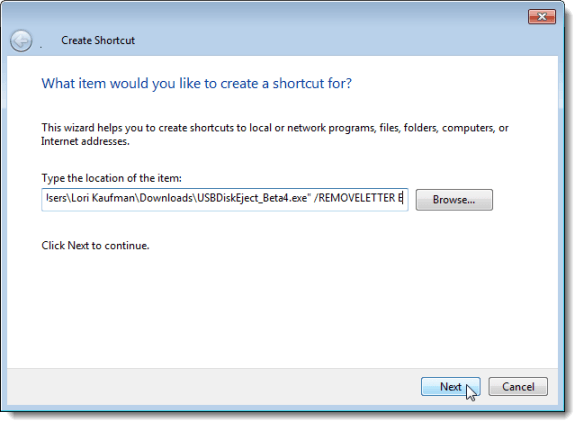
The Create Shortcut dialog box displays. In the Type the location of the item edit box, enter the command for removing a USB drive by letter from above. Make sure it is the command containing the full path. Click Next.
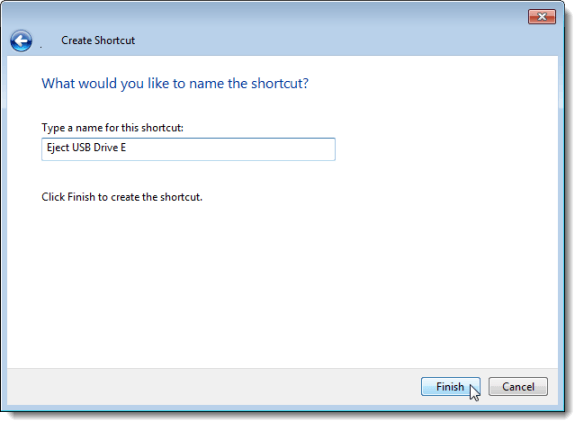
Enter a name for the shortcut in the Type a name for this shortcut edit box and click Finish.
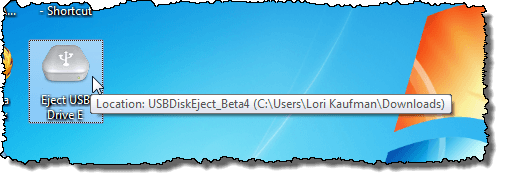
The shortcut is created on the desktop. You can add a shortcut key to the shortcut the same way you did for the shortcut to USB Disk Ejector. Refer to the steps earlier in this post for instructions.
You can also create shortcuts using the command line options in USB Disk Ejector to eject a USB drive by name, like you did in the GUI, and using the other command line options listed on the help screen.
In Part I of this series, we covered using the USB Disk Ejector GUI to eject a USB drive, creating a shortcut and a shortcut key to open USB Disk Ejector, and changing USB Disk Ejector options.
This series was meant to provide you with a fast, easy, and reliable tool for quickly and easily ejecting USB drives you use often. We hope this tool helps to make your life easier.
This two-part post shows you how to use USB Disk Ejector to eject your USB device using either the graphical user interface (GUI) or the command line and how to set up shortcuts with shortcut keys for quicker ejection of your USB drives.
Download USB Disk Ejector from
http://quick.mixnmojo.com/usb-disk-eject-1-2-beta-4-last-beta-before-release-hopefully.
Unzip the file you downloaded.
Use the USB Disk Ejector GUI to Eject a USB Drive
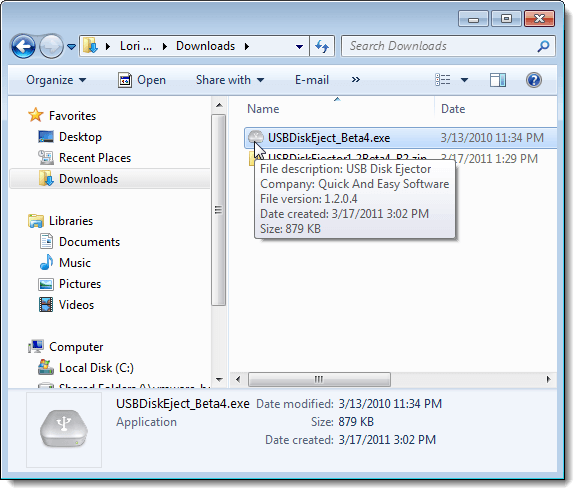
Using the USB Disk Ejector GUI to eject your USB devices is very simple. Simply double-click on the .exe file to open the program.
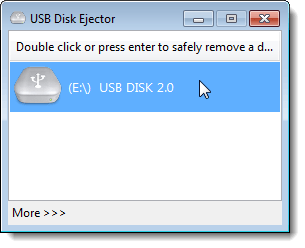
The USB Disk Ejector dialog box displays. Select the USB device you want to eject and either double-click on it or press Enter to safely remove the device.

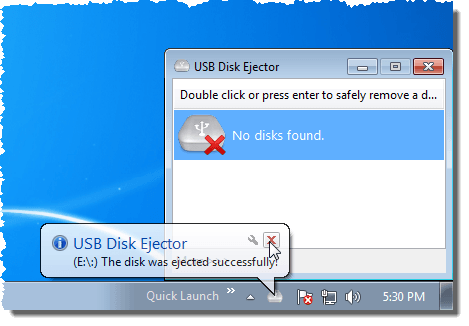
A message displays from the USB Disk Ejector system tray icon saying that the disk was ejected successfully. If there are no other USB devices connected to your system, a message saying, “No disks found.”, also displays in the USB Disk Ejector dialog box.

Create a Shortcut and Shortcut Key for USB Disk Ejector
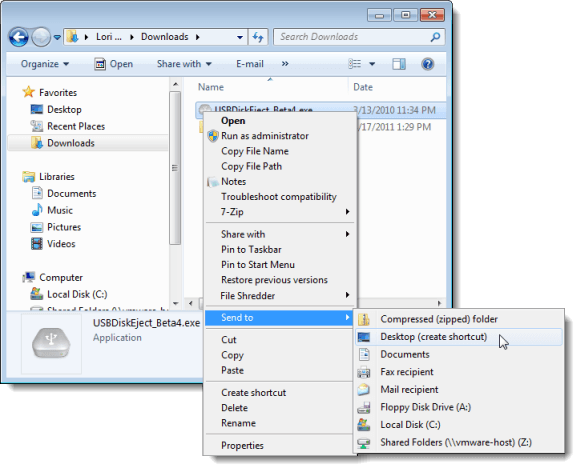
You can add a shortcut for USB Disk Ejector to your desktop with a shortcut key to make it quicker to eject a USB device. To do this, right-click on the .exe file for USB Disk Ejector and select Send to | Desktop (create shortcut) from the popup menu.
Once the shortcut is created, right-click on it and select Properties from the popup menu.

The Properties dialog box displays. On the Shortcut tab, click in the Shortcut key edit box. Press the key or key combination you want to use to open USB Disk Ejector. The keys are automatically entered into the edit box. Click OK.

Changing Options in USB Disk Ejector
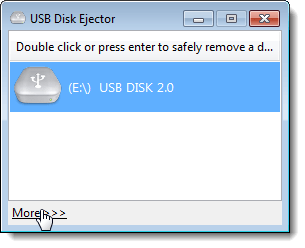
There are many options you can set in USB Disk Ejector. To access the options, click the More link at the bottom of the USB Disk Ejector dialog box.
Select Options from the popup menu that displays.

The Options dialog box displays. There are four buttons on the left side of the Options dialog box providing access to the different screens containing options. The General screen provides settings for Startup, Features, and System Tray. The version of USB Disk Ejector we used for this article is a beta version and the options in the Features section cannot be changed. You can choose to Start the program minimized in the Startup box and choose to Close to tray and Minimize to tray in the System Tray box.

The Positioning screen provides options for customizing the default size and position of the USB Disk Ejector dialog box when it opens.

The Ejection screen allows you to specify what to do with the USB Disk Ejector dialog box After a disk has been successfully ejected. If you have programs open that you have run from the USB disk you are ejecting, you can tell USB Disk Ejector to Do nothing, Ask the program to close or Force the program to close by selecting one of these options in the If any programs have been launched from the drive box. Choose which notifications about USB disk removal you want to see by selecting the desired check boxes in the Removal notifications box.

You can assign hotkeys to specific actions in USB Disk Ejector. For example, if you have a USB disk you use often and it always has the same drive letter when you connect it, you may want to be able to quickly disconnect it using a hotkey. To do this, click the Hotkeys button on the left side of the Options dialog box and then click the Add button on the Hotkeys screen.

Select Eject a drive – by drive letter from the top drop-down list.

Select the drive letter for the USB disk you want to eject from the bottom drop-down list.

Put the cursor in the edit box to the right of the top drop-down list and press the key or key combination you want to use to eject the USB drive. Click Add. The action is added to the list.
NOTE: To use hotkeys defined in the USB Disk Ejector program, you must open USB Disk Ejector first. You can do this easily using the shortcut key you created for the desktop shortcut earlier in this post. We will show you later in this post how to create a shortcut on your desktop to eject a USB drive without having to open USB Disk Ejector first.

You can also choose to eject a drive by its name by selecting Eject a drive – by drive name, selecting the drive name, entering a key or key combination, and clicking Add.

Hotkeys are added to the list as you create them. Use the Remove button to delete any hotkeys you don’t want to use anymore.
NOTE: To change a hotkey you already created, you must first remove the hotkey and then recreate it. You cannot edit hotkeys.

Wrap Up
This was the first post in a two-part series about using USB Disk Ejector to easily eject your USB devices and setting up shortcuts with shortcut keys for quicker ejection of your USB drives.In this post, we covered using the USB Disk Ejector GUI to eject a USB drive, creating a shortcut and a shortcut key to open USB Disk Ejector, and changing USB Disk Ejector options.
Stay tuned for Part II, where we will cover using the USB Disk Ejector command line to eject a USB drive and creating a shortcut for ejecting a USB drive by letter.
Welcome to the second part of this two-part series about using USB Disk Ejector to easily eject your USB devices and setting up shortcuts with shortcut keys for quicker ejection of your USB drives.
In Part I, we covered using the USB Disk Ejector GUI to eject a USB drive, creating a shortcut and a shortcut key to open USB Disk Ejector, and changing USB Disk Ejector options.
In this post, we are going to discuss using the USB Disk Ejector command line to eject a USB drive and creating a shortcut for ejecting a USB drive by letter.
Make sure you have downloaded and unzipped USB Disk Ejector prior to following the steps in this post. Also, we recommend you go through the steps in Part I before proceeding with the post.
Download USB Disk Ejector from
http://quick.mixnmojo.com/usb-disk-eject-1-2-beta-4-last-beta-before-release-hopefully.
Use the Command Line to Eject a USB Drive
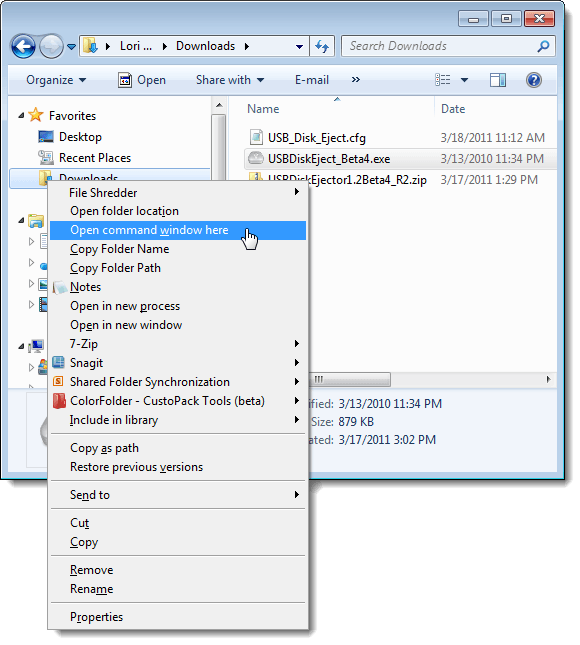
You can also use USB Disk Ejector on the command line in a command prompt window. To do this, open a command prompt window and navigate to the directory containing the USB Disk Ejector .exe file. An easy way to do this is to open Windows Explorer, navigate to the desired directory, right-click on the .exe file, and select Open command window here option from the popup menu. To access this option on the popup menu, see our post, Open a Command Prompt from any Folder in Windows.
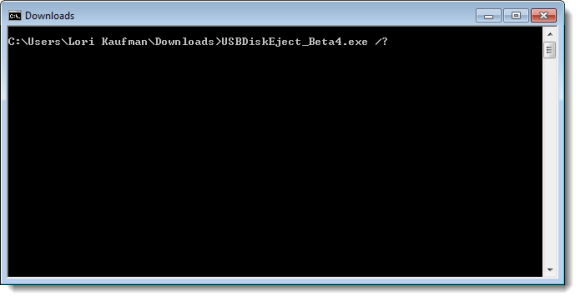
To view a list of commands available for USB Disk Ejector, enter the following line at the command prompt and press Enter.
USBDiskEject_Beta4.exe /?NOTE: If you have downloaded a different version of USB Disk Ejector, use the name of the .exe file you have.

A dialog box displays, listing all the options available for use with the USB Disk Ejector program on the command line. Click OK to close the dialog box.

To eject a USB drive by letter using the command line (the same task you performed earlier in the GUI), enter the following line at the command prompt and press Enter.
USBDiskEject_Beta4.exe /REMOVELETTER ENOTE: If you are not in the same directory as the .exe file for USB Disk Ejector, use the full path to the .exe file as follows:
“C:\Users\Lori Kaufman\Downloads\USBDiskEject_Beta4.exe” /REMOVELETTER EIf there are any spaces in the path, use quotes around it.

If you run the command for ejecting the same drive once it has already been ejected, the following error displays.

To close the command prompt window, enter “exit” (without the quotes) at the command line and press Enter.

Create a Shortcut for Ejecting a USB Drive by Letter
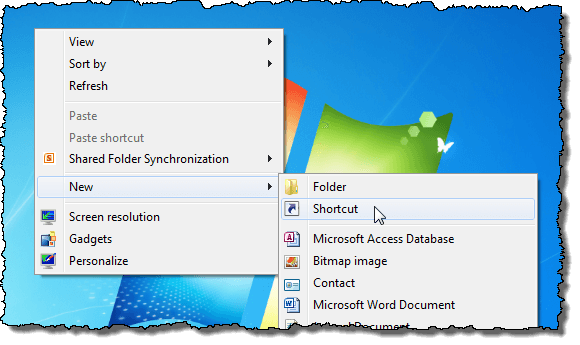
You can create a shortcut for ejecting a drive by letter, just like you did when you added a shortcut to the desktop for USB Disk Ejector earlier. To do so, right-click on the desktop and select New | Shortcut from the popup menu.
The Create Shortcut dialog box displays. In the Type the location of the item edit box, enter the command for removing a USB drive by letter from above. Make sure it is the command containing the full path. Click Next.

Enter a name for the shortcut in the Type a name for this shortcut edit box and click Finish.

The shortcut is created on the desktop. You can add a shortcut key to the shortcut the same way you did for the shortcut to USB Disk Ejector. Refer to the steps earlier in this post for instructions.

You can also create shortcuts using the command line options in USB Disk Ejector to eject a USB drive by name, like you did in the GUI, and using the other command line options listed on the help screen.
Wrap Up
In this post, we covered using the USB Disk Ejector command line to eject a USB drive and creating a shortcut for ejecting a USB drive by letter.In Part I of this series, we covered using the USB Disk Ejector GUI to eject a USB drive, creating a shortcut and a shortcut key to open USB Disk Ejector, and changing USB Disk Ejector options.
This series was meant to provide you with a fast, easy, and reliable tool for quickly and easily ejecting USB drives you use often. We hope this tool helps to make your life easier.


No comments:
Post a Comment