
OpenOffice (and LibreOffice, which is actually the program shown in the screenshots), is a powerful office suite, available for Mac, Windows and Linux. It comes with different applications, which help with a variety of tasks.
It comes with a word processor, spreadsheet, presentation creator, database, drawing program and equation editor. Each is its own separate program, although they each share a fairly similar interface.
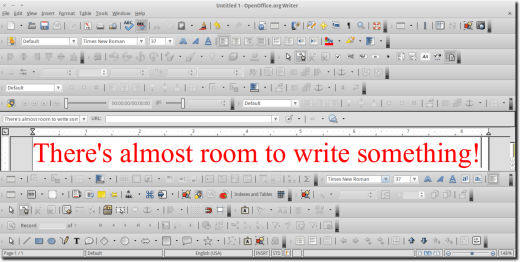
And that interface can be a bit messy. Take, for example, Writer, the word processing program. Here is what the toolbars look like, by default:

And those are only the two toolbars that are visible! There is an old joke about Microsoft Word, and how each new version seemed to add new toolbars and functions, until there was hardly any room to write. It was funny, because it was true. And it’s true of OpenOffice as well. In fact, if you turned on every available toolbar, it would look like this:
Obviously, that’s a bit silly, but even with just the two default toolbars, there are likely some functions you won’t need, while others you do need are buried in the menus. Here’s how to edit them so that the functionality you want is always visible.
The first step is to figure out what particular tools are available, which ones you want to use, and which you don’t need. To figure out the available tools on any particular toolbar, simply move your mouse to the end of any toolbar, and click the navigation button that appears at the end of every toolbar, as shown:
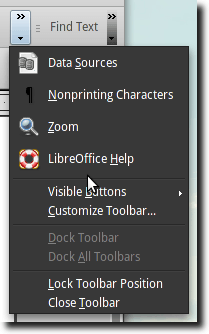
What we want from this menu is the list that will appear when navigating to Visible Buttons. Here is the list of options for the Insert menu (not shown by default in OpenOffice).
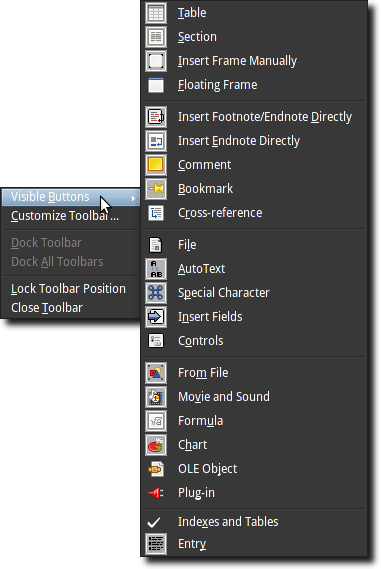
As you can see, certain options, such as Comment, Bookmark and AutoText, are highlighted, so the button is visible on the toolbar. Other items, such as Cross-reference, File and Controls, are not highlighted, so will not be visible on the toolbar.
Making an item visible is as simple as making sure it’s selected in this menu, while hiding an item is as simple as making sure it isn’t selected.
Going through this process, you’ll likely come up with a variety of features that you use, but that you don’t need the buttons for. A good example of this might be bold, italics and underline. In practically any word processor, or almost any operating system, the act of making text bold, italicized or underlined can be accomplished without the toolbar buttons.
Simply type Ctrl-B, Ctrl-I or Ctrl-U (substitute Ctrl with the Apple key if using Mac OS X), to get the required effect. Similarly, Ctrl-O will open a document, Ctrl-N creates a new one, and Ctrl-P brings up the print dialog. Chances are you don’t need these buttons, so why keep them in the toolbar, taking up room and cluttering the interface?
This article isn’t going to provide a recommended toolbar, but with a little bit of thought, you can easily pare down the default toolbar to something a bit sleeker, and more efficient, like this:

What was done here was to take the two default toolbars, remove a lot of commonly-used items that can easily be accessed via keyboard shortcuts, and then moving the lower toolbar to the same line as the top toolbar, so that only one line is used. It won’t be perfect for everyone, but something like this can easily be accomplished and will be helpful for most users.
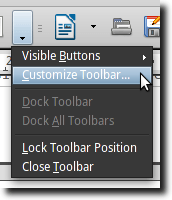
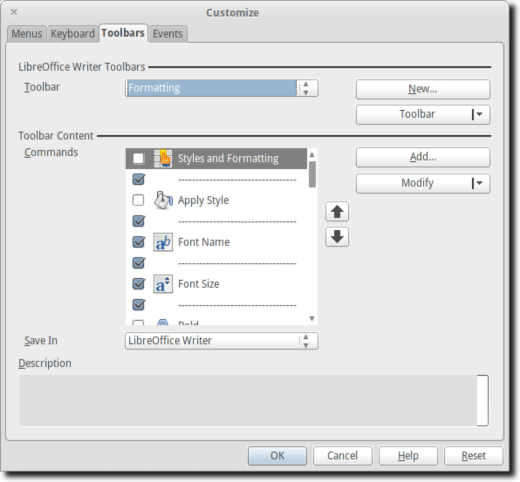
If you’ll only be doing a little bit of adjusting to your toolbars, the way shown is just fine. However, if you’ll want to adjust a lot of toolbar buttons, then choose the Customize Toolbar option as shown.
This will bring up a new window where you can accomplish the same thing as outlined above, but by simply ticking and unticking checkboxes.
Finally, when you’ve adjusted all the menus, you can combine multiple toolbars, so they take up less space. Simply grab a toolbar at the far left edge, as shown.
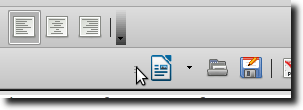
The mouse cursor will change to a little grabbing fist (not shown), and you can then drag to reposition any toolbar. Toolbars can be above the page, below, or even to the side (vertically). It’s a very customizable interface, and can pretty much be set however you like it.
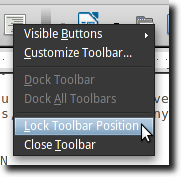
When you’re done, you can make things even more efficient by locking your toolbars. To do this, right click on any toolbar item and choose the Lock Toolbar Position.
You should now have a sleek, slimmed-down toolbar that has only the tools you need on it, and none of the ones you don’t.
It comes with a word processor, spreadsheet, presentation creator, database, drawing program and equation editor. Each is its own separate program, although they each share a fairly similar interface.
And that interface can be a bit messy. Take, for example, Writer, the word processing program. Here is what the toolbars look like, by default:
And those are only the two toolbars that are visible! There is an old joke about Microsoft Word, and how each new version seemed to add new toolbars and functions, until there was hardly any room to write. It was funny, because it was true. And it’s true of OpenOffice as well. In fact, if you turned on every available toolbar, it would look like this:
Obviously, that’s a bit silly, but even with just the two default toolbars, there are likely some functions you won’t need, while others you do need are buried in the menus. Here’s how to edit them so that the functionality you want is always visible.
The first step is to figure out what particular tools are available, which ones you want to use, and which you don’t need. To figure out the available tools on any particular toolbar, simply move your mouse to the end of any toolbar, and click the navigation button that appears at the end of every toolbar, as shown:
What we want from this menu is the list that will appear when navigating to Visible Buttons. Here is the list of options for the Insert menu (not shown by default in OpenOffice).
As you can see, certain options, such as Comment, Bookmark and AutoText, are highlighted, so the button is visible on the toolbar. Other items, such as Cross-reference, File and Controls, are not highlighted, so will not be visible on the toolbar.
Making an item visible is as simple as making sure it’s selected in this menu, while hiding an item is as simple as making sure it isn’t selected.
Going through this process, you’ll likely come up with a variety of features that you use, but that you don’t need the buttons for. A good example of this might be bold, italics and underline. In practically any word processor, or almost any operating system, the act of making text bold, italicized or underlined can be accomplished without the toolbar buttons.
Simply type Ctrl-B, Ctrl-I or Ctrl-U (substitute Ctrl with the Apple key if using Mac OS X), to get the required effect. Similarly, Ctrl-O will open a document, Ctrl-N creates a new one, and Ctrl-P brings up the print dialog. Chances are you don’t need these buttons, so why keep them in the toolbar, taking up room and cluttering the interface?
This article isn’t going to provide a recommended toolbar, but with a little bit of thought, you can easily pare down the default toolbar to something a bit sleeker, and more efficient, like this:
What was done here was to take the two default toolbars, remove a lot of commonly-used items that can easily be accessed via keyboard shortcuts, and then moving the lower toolbar to the same line as the top toolbar, so that only one line is used. It won’t be perfect for everyone, but something like this can easily be accomplished and will be helpful for most users.
If you’ll only be doing a little bit of adjusting to your toolbars, the way shown is just fine. However, if you’ll want to adjust a lot of toolbar buttons, then choose the Customize Toolbar option as shown.
This will bring up a new window where you can accomplish the same thing as outlined above, but by simply ticking and unticking checkboxes.
Finally, when you’ve adjusted all the menus, you can combine multiple toolbars, so they take up less space. Simply grab a toolbar at the far left edge, as shown.
The mouse cursor will change to a little grabbing fist (not shown), and you can then drag to reposition any toolbar. Toolbars can be above the page, below, or even to the side (vertically). It’s a very customizable interface, and can pretty much be set however you like it.
When you’re done, you can make things even more efficient by locking your toolbars. To do this, right click on any toolbar item and choose the Lock Toolbar Position.
You should now have a sleek, slimmed-down toolbar that has only the tools you need on it, and none of the ones you don’t.
No comments:
Post a Comment