
If you’re the type of person who is constantly installing, modifying, deleting and reinstalling a lot of different operating systems, then you know the pain of having to download and install the programs you want to use, each time you do this.
The drill is simple, but tedious: wipe the hard drive, install the new operating system, download all the programs you use and install them. Then, days or weeks or months later, do it all over again when you find a new operating system you want to use!
If you use Ubuntu, however, there is a simple solution to this problem. You’ll still need to download and install everything “extra” you had on your previous installation, but you won’t need to remember exactly what it was.
You can automate the process with just a few clicks. This is thanks to Synaptic Package Manager, which offers the ability to export lists of packages currently installed on your computer; these lists are called Markings. It’s a simple process, but one that should save you a lot of time.
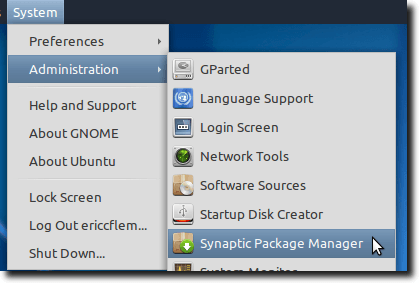
The first step is to open Synaptic, which is found in the Administration submenu inside the System menu.
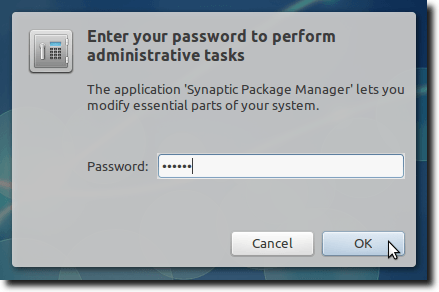
If you haven’t needed your administrative password for a few minutes, you may be asked to provide it. Go ahead and type it in, then hit OK.
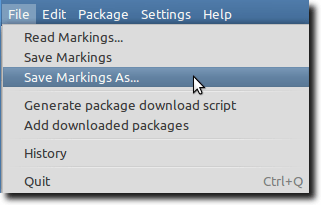
Once Synaptic has loaded, navigate to the File menu and choose the Save Markings As option.
On the save dialog that pops up, give a name to your markings file, select where to save the list, and – this is important – check the box to save the full state of your package list, and not just changes.

The reason we do this is because otherwise, only changes you made since you opened Synaptic will be saved, which means if you follow the above steps (without checking the save full state box), your markings file will be empty, because you made no other changes. What we want – and what we’ll get if we check the box – is a list of all the applications that are currently installed. When we then use this markings file on our new system, it will replicate everything we currently have installed.
Along with this, it’s also a good idea to back up your sources.list file, because if you’ve installed any software from third party repositories or PPAs, then the only way to get those on your new system is by having those same repositories active. To do this, open a Terminal and type the following:
cp /etc/apt/sources.list /home/username/Desktop
Note: be sure to substitute your username in place of “username” in the above, and any subsequent commands.
This command makes a copy of your sources.list file and places it on your Desktop. Now there’s just one more step to backing up everything that might be used. One way to add a PPA to your system involves typing something like the following into the Terminal:
sudo apt-add-repository ppa:yorba/ppa
The command adds the Yorba PPA to your list, but places it in a separate folder from your standard sources.list file. To get any of those copied to our Desktop, we’ll need to type this command:
cp /etc/apt/sources.list.d/*.list /home/username/Desktop/
This copies any file that ends with “.list” and is stored inside the sources.list.d folder to our Desktop.
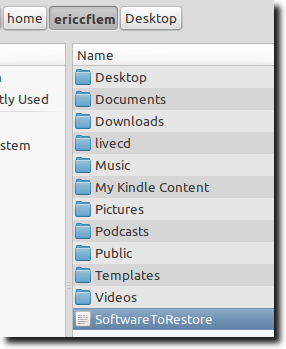
After following those commands, you should have the markings file, your sources.list file and any individual PPA lists, copied to your Desktop. Copy them to a flash drive or external hard drive so that they’re safe, and when you have the new version of Ubuntu installed, copy them back.
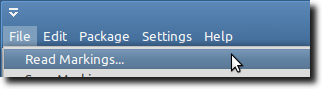
The last step to reinstalling your applications again involves opening Synaptic – this time the new version after you’ve performed a fresh install – and instead of using the Save Markings As option, select the Read Markings option.
A file dialog will open, so navigate to where your back-up markings are, and select them.
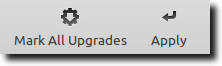
Now click the Mark All Upgrades button, followed by the Apply button.
A new dialog will pop up, informing you of any changes about to be made.
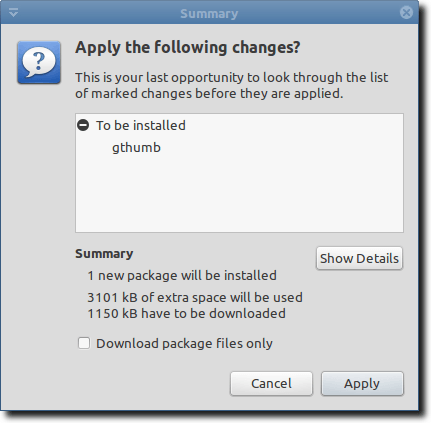
In our example, only a small number of programs needed to be backed up. Click the Apply button, Synaptic will do its thing, and in moments (maybe a lot of moments, depending on how much software needs to be downloaded and installed), all your old programs will be ready to use on your new installation.
Note: As slick a process as this is, things can go wrong. Package names sometimes change slightly between releases, and a program you installed via a PPA might not be available yet for the new release. But, all things beingn equal, it’s still a fast, simple process that should save you time, effort and aggravation.
The drill is simple, but tedious: wipe the hard drive, install the new operating system, download all the programs you use and install them. Then, days or weeks or months later, do it all over again when you find a new operating system you want to use!
If you use Ubuntu, however, there is a simple solution to this problem. You’ll still need to download and install everything “extra” you had on your previous installation, but you won’t need to remember exactly what it was.
You can automate the process with just a few clicks. This is thanks to Synaptic Package Manager, which offers the ability to export lists of packages currently installed on your computer; these lists are called Markings. It’s a simple process, but one that should save you a lot of time.
The first step is to open Synaptic, which is found in the Administration submenu inside the System menu.
If you haven’t needed your administrative password for a few minutes, you may be asked to provide it. Go ahead and type it in, then hit OK.
Once Synaptic has loaded, navigate to the File menu and choose the Save Markings As option.
On the save dialog that pops up, give a name to your markings file, select where to save the list, and – this is important – check the box to save the full state of your package list, and not just changes.
The reason we do this is because otherwise, only changes you made since you opened Synaptic will be saved, which means if you follow the above steps (without checking the save full state box), your markings file will be empty, because you made no other changes. What we want – and what we’ll get if we check the box – is a list of all the applications that are currently installed. When we then use this markings file on our new system, it will replicate everything we currently have installed.
Along with this, it’s also a good idea to back up your sources.list file, because if you’ve installed any software from third party repositories or PPAs, then the only way to get those on your new system is by having those same repositories active. To do this, open a Terminal and type the following:
cp /etc/apt/sources.list /home/username/Desktop
Note: be sure to substitute your username in place of “username” in the above, and any subsequent commands.
This command makes a copy of your sources.list file and places it on your Desktop. Now there’s just one more step to backing up everything that might be used. One way to add a PPA to your system involves typing something like the following into the Terminal:
sudo apt-add-repository ppa:yorba/ppa
The command adds the Yorba PPA to your list, but places it in a separate folder from your standard sources.list file. To get any of those copied to our Desktop, we’ll need to type this command:
cp /etc/apt/sources.list.d/*.list /home/username/Desktop/
This copies any file that ends with “.list” and is stored inside the sources.list.d folder to our Desktop.
After following those commands, you should have the markings file, your sources.list file and any individual PPA lists, copied to your Desktop. Copy them to a flash drive or external hard drive so that they’re safe, and when you have the new version of Ubuntu installed, copy them back.
The last step to reinstalling your applications again involves opening Synaptic – this time the new version after you’ve performed a fresh install – and instead of using the Save Markings As option, select the Read Markings option.
A file dialog will open, so navigate to where your back-up markings are, and select them.
Now click the Mark All Upgrades button, followed by the Apply button.
A new dialog will pop up, informing you of any changes about to be made.
In our example, only a small number of programs needed to be backed up. Click the Apply button, Synaptic will do its thing, and in moments (maybe a lot of moments, depending on how much software needs to be downloaded and installed), all your old programs will be ready to use on your new installation.
Note: As slick a process as this is, things can go wrong. Package names sometimes change slightly between releases, and a program you installed via a PPA might not be available yet for the new release. But, all things beingn equal, it’s still a fast, simple process that should save you time, effort and aggravation.
No comments:
Post a Comment