
Adding support for a wide range of formats, codecs and media in Linux can be a bit daunting. There are numerous playback engines (Xine, MPlayer, GStreamer, VLC), which can be confusing. And since Linux – by its very nature – favors open solutions, you often have an operating system that often doesn’t have much out-of-the-box support for some common multimedia formats.
What formats are we talking about? Well, a default installation of Ubuntu can’t play any of your MP3s. It can’t play videos on Hulu or YouTube. It can’t play the Divx file you downloaded off the Internet, and it can’t play your store-bought DVD disks. Linux can play them, but because some are restricted by patent or licensing issues (which vary from country to country), many Linux distributions simply forego support in any of their versions. This can be both tedious and annoying.
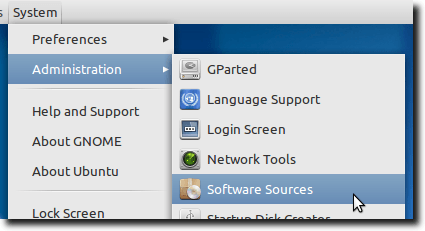
In Ubuntu, we can do this first part graphically (although the Terminal will be far superior for actually installing the rest of the software), by going to the Software Sources preference pane. You can find Software Sources in the System Menu, then the Administration submenu.
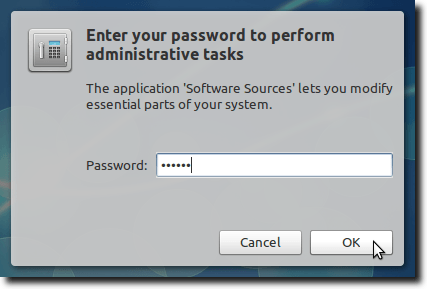
 If you haven’t logged in as root lately, you may need to enter your administrator password.
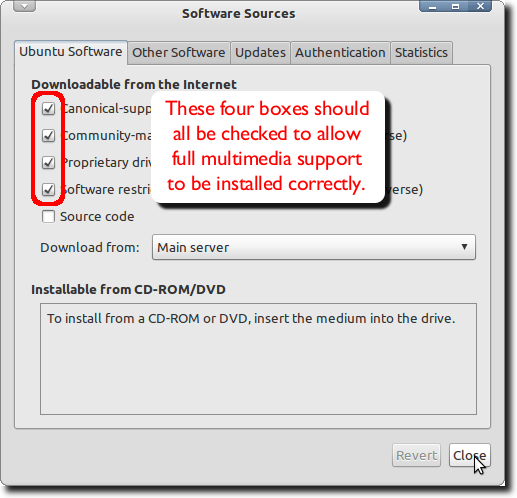
 All we need to do is make sure the top four checkboxes are checked, as shown here:
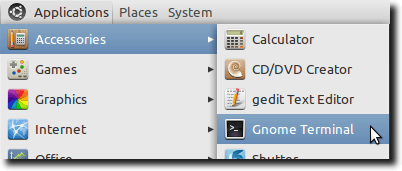
 Close the Software Sources window, then open a Terminal window.
 Once the Terminal is open, type the following, which will update our list of available software, taking into account the extra repositories we just activated.
sudo apt-get update
We will now begin installing, so keep your Terminal window open and ready.
sudo apt-get install ubuntu-restricted-extras
or
sudo apt-get install kubuntu-restricted-extras
or
sudo apt-get install xubuntu-restricted-extras
or
sudo apt-get install lubuntu-restricted-extras
Those commands, install the restricted-extras package for the Ubuntu “flavor” of your choosing.
The restricted-extras package doesn’t cover everything, however (for instance, commercial DVD playback still isn’t supported), and even though you may get a lot of “stuff,” sometimes you don’t want everything the package offers, or maybe you’ve already installed it from the official sources.
The rest of this tutorial takes you through the process of installing individual support elements. At the end of this tutorial, you’ll be able to play Divx, Flash, MP3, WMA/WMV, Quicktime, AVI, MKV, MP4 and more. You’ll be able to run Java applets, use Microsoft’s Core Fonts, extract common archive formats, and play commercial DVDs. You can tweak this guide to only install what you want, or use the whole thing. Let’s get started.
sudo apt-get install adobe-flashplugin
This will grab the latest Adobe Flash Plugin from the official Canonical Partner repository.
sudo apt-get install gstreamer0.10-plugins-good gstreamer0.10-plugins-bad gstreamer0.10-plugins-bad-multiverse gstreamer0.10-plugins-ugly gstreamer0.10-plugins-ugly-multiverse gstreamer0.10-ffmpeg ffmpeg libavcodec-extra-52 libavdevice-extra-52 libavfilter-extra-0 libavformat-extra-52 libavutil-extra-49 libavswscale-extra-0 libpostproc-extra-51 flac faac faad lame twolame vorbis-tools mpeg2dec mjpegtools transcode transcode-utils mplayer mencoder x264
Note: in the above list are a few libraries with names such as libavcodec-extra-52, libavdevice-extra-52 and libpostproc-extra-51. As the software is updated, the numbers after “extra” will eventually change, so if (sometime in the future) something seems “broken” about this command, check that first.
sudo apt-get install sun-java6-jre sun-java6-plugin sun-java6-fonts
This provides us with the Java web browser plugin, the Java Runtime Edition, and Java fonts.
sudo apt-get install ttf-mscorefonts-installer
This will download an installer script, which will then download, extract and install the Microsoft Core Fonts, which include Ariel, Comic Sans, Courier, Georgia, Times New Roman, Verdana and more.
First, install libdvdread4 (if it isn’t already):
sudo apt-get install libdvdread4
Once that is installed, type the following in the Terminal:
sudo /usr/share/doc/libdvdread4/install-css.sh
Wait while the script downloads and installs the libdvdcss2 library (which allows for viewing encrypted DVDs), and you’re set!
sudo apt-get install p7zip-full p7zip-rar rar unrar unrar-free zip unzip tar unace unace-nonfree gzip bzip2 par2
Once that is accomplished, you should have a handle on practically any format someone throws at you, plus the ability (thanks to par2) to repair broken RAR files.
Note: there is quite a bit of duplication in the items installed. For instance, p7zip-full and zip and unzip cover a lot of the same ground, but there are many weird varieties of standard compression schemes “out there,” so it never hurts to cover your bases, as far as we’re concerned.
What formats are we talking about? Well, a default installation of Ubuntu can’t play any of your MP3s. It can’t play videos on Hulu or YouTube. It can’t play the Divx file you downloaded off the Internet, and it can’t play your store-bought DVD disks. Linux can play them, but because some are restricted by patent or licensing issues (which vary from country to country), many Linux distributions simply forego support in any of their versions. This can be both tedious and annoying.
Setting Up Our Repositories
Ubuntu uses four basic repositories: main, restricted, universe and multiverse. Each houses software with either different levels of support from Ubuntu, or different licenses. Since a lot of the software we’ll be installing is in the universe and multiverse repositories (which are turned off by default), we’ll need to turn them on.In Ubuntu, we can do this first part graphically (although the Terminal will be far superior for actually installing the rest of the software), by going to the Software Sources preference pane. You can find Software Sources in the System Menu, then the Administration submenu.
sudo apt-get update
We will now begin installing, so keep your Terminal window open and ready.
Install Restricted-Extras In Ubuntu
Ubuntu offers a restricted extras package, tailored for its various offerings (Ubuntu, Xubuntu, Kubuntu, etc.), that installs multimedia playback for a wide variety of formats, as well as offering other restricted items, such as Microsoft’s Core Fonts, Java, and Adobe Flash. And it’s easy to install! Just type one of the following lines, depending on your Ubuntu version:sudo apt-get install ubuntu-restricted-extras
or
sudo apt-get install kubuntu-restricted-extras
or
sudo apt-get install xubuntu-restricted-extras
or
sudo apt-get install lubuntu-restricted-extras
Those commands, install the restricted-extras package for the Ubuntu “flavor” of your choosing.
The restricted-extras package doesn’t cover everything, however (for instance, commercial DVD playback still isn’t supported), and even though you may get a lot of “stuff,” sometimes you don’t want everything the package offers, or maybe you’ve already installed it from the official sources.
The rest of this tutorial takes you through the process of installing individual support elements. At the end of this tutorial, you’ll be able to play Divx, Flash, MP3, WMA/WMV, Quicktime, AVI, MKV, MP4 and more. You’ll be able to run Java applets, use Microsoft’s Core Fonts, extract common archive formats, and play commercial DVDs. You can tweak this guide to only install what you want, or use the whole thing. Let’s get started.
Installing Support For Adobe Flash Videos and Games
This will allow us to play games, view videos and yes, ads that use Adobe Flash, something practically everyone uses or wants, so type the following:sudo apt-get install adobe-flashplugin
This will grab the latest Adobe Flash Plugin from the official Canonical Partner repository.
Installing Support For Multimedia Playback and Encoding
Now type the following (or copy and paste, since it’s quite long), which will install the GStreamer plugins, along with the libav extra packages, and a few other goodies, which enable a full range of support (both playback and editing), for MP3, AAC, FLAC, AVI, DIVX, WMA, WMV, MPEG, and a whole lot more.sudo apt-get install gstreamer0.10-plugins-good gstreamer0.10-plugins-bad gstreamer0.10-plugins-bad-multiverse gstreamer0.10-plugins-ugly gstreamer0.10-plugins-ugly-multiverse gstreamer0.10-ffmpeg ffmpeg libavcodec-extra-52 libavdevice-extra-52 libavfilter-extra-0 libavformat-extra-52 libavutil-extra-49 libavswscale-extra-0 libpostproc-extra-51 flac faac faad lame twolame vorbis-tools mpeg2dec mjpegtools transcode transcode-utils mplayer mencoder x264
Note: in the above list are a few libraries with names such as libavcodec-extra-52, libavdevice-extra-52 and libpostproc-extra-51. As the software is updated, the numbers after “extra” will eventually change, so if (sometime in the future) something seems “broken” about this command, check that first.
Installing Java Support
The simplest way to install Java support is the following command, which will install Java from the Ubuntu repositories:sudo apt-get install sun-java6-jre sun-java6-plugin sun-java6-fonts
This provides us with the Java web browser plugin, the Java Runtime Edition, and Java fonts.
Installing Microsoft Core Fonts
This is another simple command:sudo apt-get install ttf-mscorefonts-installer
This will download an installer script, which will then download, extract and install the Microsoft Core Fonts, which include Ariel, Comic Sans, Courier, Georgia, Times New Roman, Verdana and more.
Installing Support for Commercial DVDs
There’s no need for third-party repositories here, even though the library we’re after – libdvdcss2 – isn’t part of the Ubuntu software offerings. However, if we install libdvdread4 (which we’ll need to actually navigate a DVD, and should have been installed when adding full multimedia support), then there’s a simple script that will grab libdvdcss2 for us.First, install libdvdread4 (if it isn’t already):
sudo apt-get install libdvdread4
Once that is installed, type the following in the Terminal:
sudo /usr/share/doc/libdvdread4/install-css.sh
Wait while the script downloads and installs the libdvdcss2 library (which allows for viewing encrypted DVDs), and you’re set!
Archive Formats
You likely have to deal with a variety of archive formats every day. Some of them are pretty common, like Zip, while others are a bit more specific to Linux (as opposed to Windows or Mac), such as gzip and bzip. To install as much suport as possible, the following command should do the trick:sudo apt-get install p7zip-full p7zip-rar rar unrar unrar-free zip unzip tar unace unace-nonfree gzip bzip2 par2
Once that is accomplished, you should have a handle on practically any format someone throws at you, plus the ability (thanks to par2) to repair broken RAR files.
Note: there is quite a bit of duplication in the items installed. For instance, p7zip-full and zip and unzip cover a lot of the same ground, but there are many weird varieties of standard compression schemes “out there,” so it never hurts to cover your bases, as far as we’re concerned.
No comments:
Post a Comment