Click on Start>All Programs>Windows Virtual PC>Windows Virtual PC. This opens the Virtual Machines folder in Windows 7 Professional. Right click on the Windows XP Mode Virtual Machine you want to edit and select Settings from the menu.

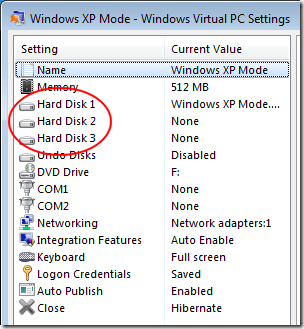
In the Windows XP Mode – Windows Virtual PC Settings window, note how many hard disks are associated with the Virtual Machine. If you are like most people, your Hard Disk 1 is Windows XP Mode and you have None next to Hard Disk 2 and Hard Disk 3.

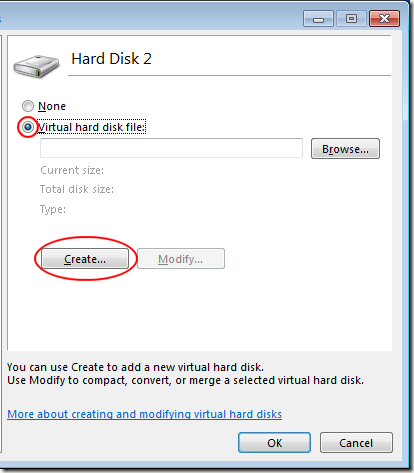
Click on Hard Disk 2 and notice that the right side of the window changes to let you add or edit the hard disk. Select the Virtual Hard Disk File option and click the Create button.

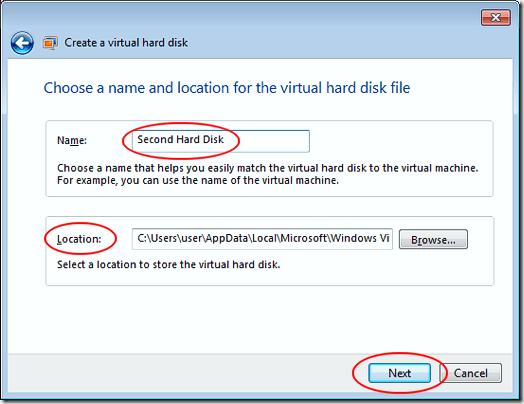
In the Create a Virtual Hard Disk window, click on the Dynamically Expanding link and give the disk a name. You can name the disk anything you want and spaces are OK. Leave the Location alone unless you want to store the new virtual disk somewhere other than the default location. Click the Next button.

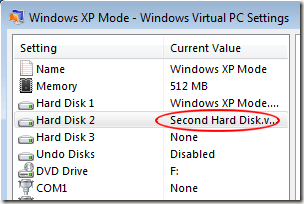
In the next window, you have to specify the size of the virtual hard disk. Although the disk expands to accommodate the data stored on it, you still have to set a maximum size in MB. For now, let’s create a 6GB hard disk. Type 6000 into the Size variable and click the Create button. When you do, Windows Virtual PC will automatically add the new disk to your XP Mode Virtual Machine.

The next time you startup XP Mode, you will notice a new hard disk listed under My Computer. This drive works just like any other Virtual Machine hard disk; it has a drive letter associated with it and you can immediately start dragging files and saving data to it.
Now that you know how to do it, you can add any number of virtual hard disks to an XP Mode Virtual Machine to keep files, information, and data safe and separate from the virtual disk that holds the operating system.

In the Windows XP Mode – Windows Virtual PC Settings window, note how many hard disks are associated with the Virtual Machine. If you are like most people, your Hard Disk 1 is Windows XP Mode and you have None next to Hard Disk 2 and Hard Disk 3.

Click on Hard Disk 2 and notice that the right side of the window changes to let you add or edit the hard disk. Select the Virtual Hard Disk File option and click the Create button.

In the Create a Virtual Hard Disk window, click on the Dynamically Expanding link and give the disk a name. You can name the disk anything you want and spaces are OK. Leave the Location alone unless you want to store the new virtual disk somewhere other than the default location. Click the Next button.

In the next window, you have to specify the size of the virtual hard disk. Although the disk expands to accommodate the data stored on it, you still have to set a maximum size in MB. For now, let’s create a 6GB hard disk. Type 6000 into the Size variable and click the Create button. When you do, Windows Virtual PC will automatically add the new disk to your XP Mode Virtual Machine.

The next time you startup XP Mode, you will notice a new hard disk listed under My Computer. This drive works just like any other Virtual Machine hard disk; it has a drive letter associated with it and you can immediately start dragging files and saving data to it.
Now that you know how to do it, you can add any number of virtual hard disks to an XP Mode Virtual Machine to keep files, information, and data safe and separate from the virtual disk that holds the operating system.


No comments:
Post a Comment