
Sometimes you may want to create a letter that you will be sending to a lot of different people, but you’d like certain parts of it to be individualized to the addressee; parts such as the greeting, name, address, etc.; which means, you want to create a form letter, which is great, because Microsoft over the past several versions of Word has been making it easier to do so.
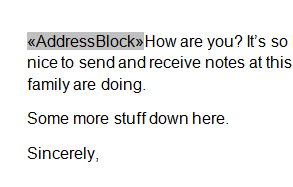
To begin, create a document that has the standard stuff in it, here’s an example Christmas letter:
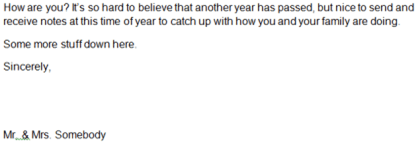
Notice how it has no salutation, address,etc., this is because those will all be added as fields later.
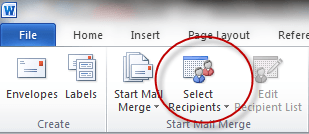
The first thing you need to do is click on Select Recipients, on the Mailings ribbon:

This is where you add the people that will be receiving the letter.
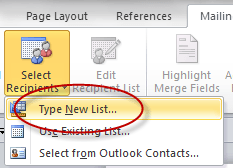
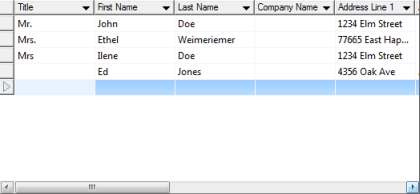
Click Type New List… to start adding people, then add several names:

Note: When you go to save your recipient list, Word will prompt you for a location on your hard drive to save the data file that will be created.
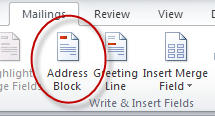
Once you save your recipients list, you should notice that a lot of the icons that are on the Mailings ribbon are highlighted now. To start adding fields to your from letter, click a spot in your document to indicate where you want the field to be placed, then click on Address Block:
Here’s what it looks like:
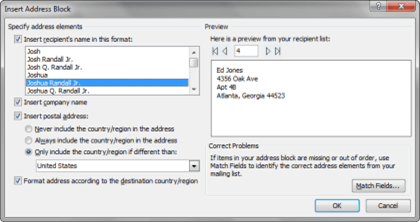
Click OK to go with the default format, you should get something that looks like this:
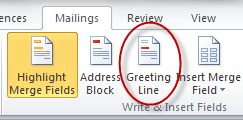
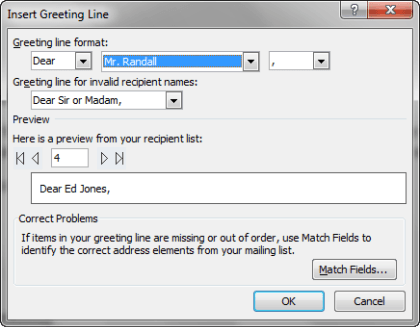
Next, add an Enter after the Address Block to move your text down a line, then click on the Greeting Line icon:
You should get something like this:

Once again, let’s go with the default format and just click the OK button.
Next, highlight where it says <Address Block> click your right mouse button, chose Paragraph, then check the box next to where it says Don’t add space between paragraphs of the same style, then click the OK button. This will make the address block hang together correctly instead of having a blank line between each part of it.
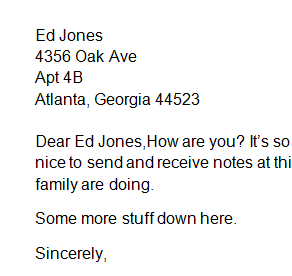
Then, click on the Preview Results icon, your document should now look something like this:

When you’re done previewing, click the Preview Results icon to turn off previewing.
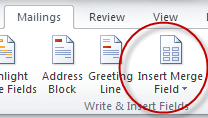
Next, to see how to add other fields, click just past the <Address Block> in your document to make that your current position, then click on the Insert Merge Field icon.
You should get something like this:
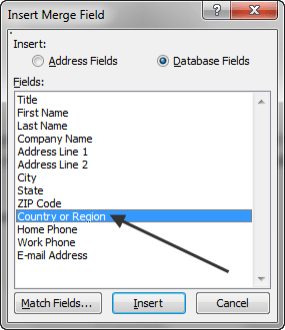
Choose Country or Region, then click on the Insert button, you should get something like this:
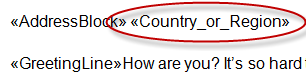
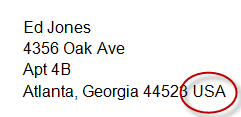
Try clicking the Preview Results icon again to see how it looks, it should look something like this:

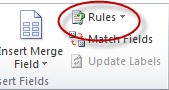
Now that you have your form letter looking as you want it, you might decide that you want to add some particular text for some of your recipients, but some other text to others; to do that, click where it says Rules

…you should get a screen like this dropdown:
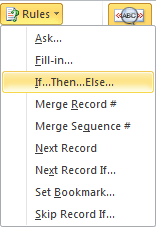
Choose If…Then…Else, to get this screen:
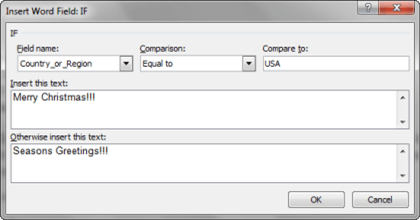
Change the Field name: to Country_or_ Region, and type USA into the Compare to: field, and then add some text to the boxes where it says Insert this text, and Otherwise insert this text. In this example if the recipient lives in the USA, they will get the text, Merry Christmas inserted into their letter, while everyone else will get the message, Seasons Greetings.
Here’s what it will look like once you click the OK button and then the Preview Results button.

Next, note the Preview Results section:

Here you can click on the arrow buttons (when Preview Results is turned on) to the left and right of the number to scroll though all of the letters that will be sent out. This way you can make sure that all of your letters will look right before sending them out.
Note: The match fields menu choice under Rules is for matching field names in a database with header names in your recipients list.
Also to make it easier to see where you’ve inserted fields into your document, use the Highlight Merge Fields button:

It’s a toggle you can turn on and off at your discretion.
And finally, when you’re happy with your letter, click the Finish & Merge icon:

You should get this dropdown menu:
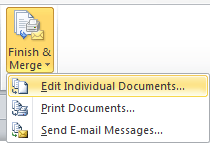
Choose Edit Individual Documents to get Word to merge all your letters together into your current document; that way you can look it over before printing or sending as an email.
As you can see, creating form letters with Word is no longer the chore it once was, you can create documents quickly and and send them out without much trouble; now that you’ve learned how.
To begin, create a document that has the standard stuff in it, here’s an example Christmas letter:

Notice how it has no salutation, address,etc., this is because those will all be added as fields later.
The first thing you need to do is click on Select Recipients, on the Mailings ribbon:
This is where you add the people that will be receiving the letter.

Click Type New List… to start adding people, then add several names:
Note: When you go to save your recipient list, Word will prompt you for a location on your hard drive to save the data file that will be created.
Once you save your recipients list, you should notice that a lot of the icons that are on the Mailings ribbon are highlighted now. To start adding fields to your from letter, click a spot in your document to indicate where you want the field to be placed, then click on Address Block:

Here’s what it looks like:

Click OK to go with the default format, you should get something that looks like this:

Next, add an Enter after the Address Block to move your text down a line, then click on the Greeting Line icon:
You should get something like this:
Once again, let’s go with the default format and just click the OK button.
Next, highlight where it says <Address Block> click your right mouse button, chose Paragraph, then check the box next to where it says Don’t add space between paragraphs of the same style, then click the OK button. This will make the address block hang together correctly instead of having a blank line between each part of it.
Then, click on the Preview Results icon, your document should now look something like this:
When you’re done previewing, click the Preview Results icon to turn off previewing.
Next, to see how to add other fields, click just past the <Address Block> in your document to make that your current position, then click on the Insert Merge Field icon.
You should get something like this:

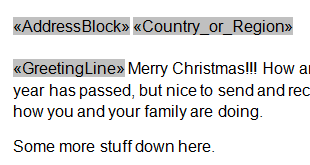
Choose Country or Region, then click on the Insert button, you should get something like this:

Try clicking the Preview Results icon again to see how it looks, it should look something like this:
Now that you have your form letter looking as you want it, you might decide that you want to add some particular text for some of your recipients, but some other text to others; to do that, click where it says Rules
…you should get a screen like this dropdown:

Choose If…Then…Else, to get this screen:
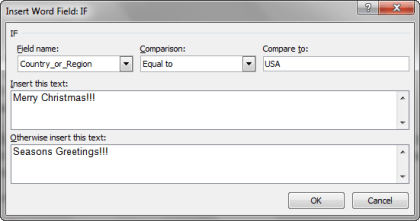
Change the Field name: to Country_or_ Region, and type USA into the Compare to: field, and then add some text to the boxes where it says Insert this text, and Otherwise insert this text. In this example if the recipient lives in the USA, they will get the text, Merry Christmas inserted into their letter, while everyone else will get the message, Seasons Greetings.
Here’s what it will look like once you click the OK button and then the Preview Results button.

Next, note the Preview Results section:
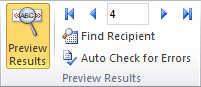
Here you can click on the arrow buttons (when Preview Results is turned on) to the left and right of the number to scroll though all of the letters that will be sent out. This way you can make sure that all of your letters will look right before sending them out.
Note: The match fields menu choice under Rules is for matching field names in a database with header names in your recipients list.
Also to make it easier to see where you’ve inserted fields into your document, use the Highlight Merge Fields button:
It’s a toggle you can turn on and off at your discretion.
And finally, when you’re happy with your letter, click the Finish & Merge icon:

You should get this dropdown menu:

Choose Edit Individual Documents to get Word to merge all your letters together into your current document; that way you can look it over before printing or sending as an email.
As you can see, creating form letters with Word is no longer the chore it once was, you can create documents quickly and and send them out without much trouble; now that you’ve learned how.
No comments:
Post a Comment