We have previously written about a method for recovering the license keys for Microsoft Windows and Microsoft Office programs using a tool called Keyfinder (see our post, Recover Your Lost Windows XP, Windows Vista and Microsoft Office Product Keys). Keyfinder also allowed you to recover the license keys for some other programs, but the list was limited.
We have found another free tool, called LicenseCrawler, that recovers license keys by crawling through the registry to find all the license keys and serial numbers for all software installed on your system.
Download LicenseCrawler from
http://www.klinzmann.name/licensecrawler_download.htm.
NOTE: We chose to download LicenseCrawler from FreewareFiles. Softonic has an extra download process you must go through to get the file.
You will get a .zip file from FreewareFiles. LicenseCrawler does not need to be installed. Simply, unzip the file you downloaded and double-click the LicenseCrawler.exe file to run LicenseCrawler.

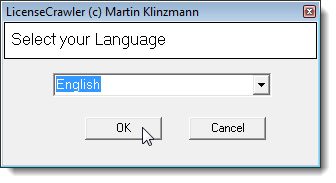
The Select your Language dialog box displays. Select the desired language from the drop-down list and click OK.

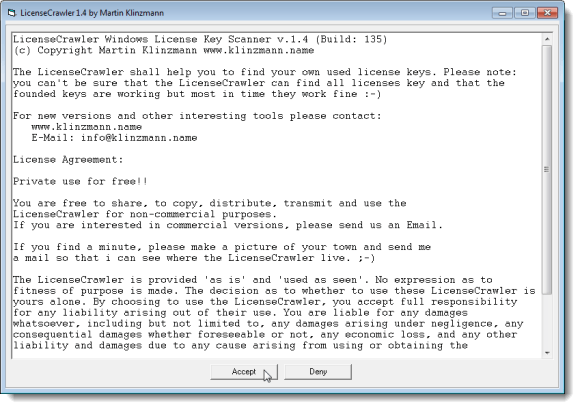
The LicenseCrawler license dialog box displays. Click Accept to continue.

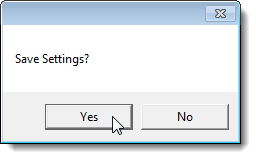
The selected language and the fact that you accepted the license can be saved into a settings file, if you choose to. To do this, click Yes on the Save Settings dialog box.

The LicenseCrawler main window displays. You can choose to search your current machine (Localhost) for license keys or other machines in the same network. To search another machine in the network, click the down arrow on the Computer drop-down list.

The Searching for Computer dialog box displays while LicenseCrawler searches for other machines in the network.

If there are no other machines on the network, an error displays. If other machines are found on the network, they are displayed in the Computer drop-down list. Select a machine from the Computer drop-down list.
NOTE: You will need a valid username and password for the remote machine you select in the network and the ability to access the registry.

You can change the registry path by selecting an option from the drop-down list below the Computer drop-down list. We recommend you leave the registry path as the default, HKEY_LOCAL_MACHINE.

To start the search for your license keys, click Search.

Some advertising dialog boxes may display before the search begins. Click Disable this Screen. You can select the Close after time-out check box, instead, to have no more ads display after the countdown is finished.

Once the countdown is finished, you can click OK to close the dialog box.

The keys being searched display in the Searching edit box as the search progresses. When the search is finished, the Searching edit box indicates the search is Done. The number of serial numbers displays below the Searching edit box and the license keys and serials numbers are displayed in the large text box.

You can save the license keys and serial numbers to a plain text file or an encrypted text file. To save an encrypted text file, select Save Encrypted from the File menu.

The Save as dialog box displays. Navigate to the folder in which you want to save the file.
NOTE: The default folder is the LicenseCrawler folder, where the LicenseCrawler.exe file is located. We recommend you save the file in the LicenseCrawler folder. This allows you to easily backup your license keys and serial numbers to an external drive just by copying the LicenseCrawler folder. Then, you can easily access your license keys and serial numbers once you have reinstalled Windows, if needed.
Enter a name for the file in the File name edit box and click Save.

The Save file encrypted dialog box displays. Enter a password in the edit box and click OK. Note that the password displays in clear text.

You see encrypted text in the license keys file when you open it.

To view your license keys in clear text, open LicenseCrawler, if it is not already open. Select Load from the File menu.

The Open File dialog box displays. Navigate to the folder where you saved the text file. Again, the selected folder defaults to the folder containing the LicenseCrawler.exe file. Select the text file and click Open.

On the File Open dialog box that displays, enter the password you assigned to the encrypted text file in the edit box and click OK. The list of license keys and serial numbers displays in the large text box on the LicenseCrawler main window.

You can change the language used in LicenseCrawler by selecting Language from the Tools menu. If you change the language while in the program, you can resave the settings file so the program opens using the newly selected language next time. To do this, select Save Properties from the File menu.

The Save Settings dialog box displays again. Click Yes to save the new settings.

The settings are saved in the LicenseCrawler.ini file in the same folder as the LicenseCrawler.exe file.

If you open the LicenseCrawler.ini file in a text editor, you will notice that the selected language and the fact that you accepted the license agreement are saved in the file.

You can also run LicenseCrawler on the command line. To view the available commands available for use on the command line, select Help from the Help menu.

A dialog box displays listing the available commands and examples of using LicenseCrawler on the command line with the commands. Click OK at the bottom of the dialog box to close it.

To close LicenseCrawler, click Exit.

If you don’t want to encrypt the file you save containing your license keys and serial numbers, you can save it as a plain text file. However, if you chose to save your license keys and serial numbers in a plain, unencrypted text file, we recommend you encrypt the data another way to secure your license keys.
There are ways of encrypting the file or the information after it’s saved. You can encrypt the text file using a tool called Omziff (see our post, Encrypt and Password Protect Text Files for Free), or you can copy and paste the text from the file into a LockNote file (see our post, Secure Private Information with Text Files in Windows).
If you copy and paste the information into a separate LockNote file, make sure you securely delete the unencrypted file using a tool like Omziff, File Shredder (see our two-part post, Securely Delete Files Using a Free File Shredder Tool – Part I and Securely Delete Files Using a Free File Shredder Tool – Part II), or DeleteOnClick (see our post, Securely Delete Files Using the Context Menu in Windows).
We have found another free tool, called LicenseCrawler, that recovers license keys by crawling through the registry to find all the license keys and serial numbers for all software installed on your system.
Download LicenseCrawler from
http://www.klinzmann.name/licensecrawler_download.htm.
NOTE: We chose to download LicenseCrawler from FreewareFiles. Softonic has an extra download process you must go through to get the file.
You will get a .zip file from FreewareFiles. LicenseCrawler does not need to be installed. Simply, unzip the file you downloaded and double-click the LicenseCrawler.exe file to run LicenseCrawler.

The Select your Language dialog box displays. Select the desired language from the drop-down list and click OK.

The LicenseCrawler license dialog box displays. Click Accept to continue.

The selected language and the fact that you accepted the license can be saved into a settings file, if you choose to. To do this, click Yes on the Save Settings dialog box.

The LicenseCrawler main window displays. You can choose to search your current machine (Localhost) for license keys or other machines in the same network. To search another machine in the network, click the down arrow on the Computer drop-down list.

The Searching for Computer dialog box displays while LicenseCrawler searches for other machines in the network.

If there are no other machines on the network, an error displays. If other machines are found on the network, they are displayed in the Computer drop-down list. Select a machine from the Computer drop-down list.
NOTE: You will need a valid username and password for the remote machine you select in the network and the ability to access the registry.

You can change the registry path by selecting an option from the drop-down list below the Computer drop-down list. We recommend you leave the registry path as the default, HKEY_LOCAL_MACHINE.

To start the search for your license keys, click Search.

Some advertising dialog boxes may display before the search begins. Click Disable this Screen. You can select the Close after time-out check box, instead, to have no more ads display after the countdown is finished.

Once the countdown is finished, you can click OK to close the dialog box.

The keys being searched display in the Searching edit box as the search progresses. When the search is finished, the Searching edit box indicates the search is Done. The number of serial numbers displays below the Searching edit box and the license keys and serials numbers are displayed in the large text box.

You can save the license keys and serial numbers to a plain text file or an encrypted text file. To save an encrypted text file, select Save Encrypted from the File menu.

The Save as dialog box displays. Navigate to the folder in which you want to save the file.
NOTE: The default folder is the LicenseCrawler folder, where the LicenseCrawler.exe file is located. We recommend you save the file in the LicenseCrawler folder. This allows you to easily backup your license keys and serial numbers to an external drive just by copying the LicenseCrawler folder. Then, you can easily access your license keys and serial numbers once you have reinstalled Windows, if needed.
Enter a name for the file in the File name edit box and click Save.

The Save file encrypted dialog box displays. Enter a password in the edit box and click OK. Note that the password displays in clear text.

You see encrypted text in the license keys file when you open it.

To view your license keys in clear text, open LicenseCrawler, if it is not already open. Select Load from the File menu.

The Open File dialog box displays. Navigate to the folder where you saved the text file. Again, the selected folder defaults to the folder containing the LicenseCrawler.exe file. Select the text file and click Open.

On the File Open dialog box that displays, enter the password you assigned to the encrypted text file in the edit box and click OK. The list of license keys and serial numbers displays in the large text box on the LicenseCrawler main window.

You can change the language used in LicenseCrawler by selecting Language from the Tools menu. If you change the language while in the program, you can resave the settings file so the program opens using the newly selected language next time. To do this, select Save Properties from the File menu.

The Save Settings dialog box displays again. Click Yes to save the new settings.

The settings are saved in the LicenseCrawler.ini file in the same folder as the LicenseCrawler.exe file.

If you open the LicenseCrawler.ini file in a text editor, you will notice that the selected language and the fact that you accepted the license agreement are saved in the file.

You can also run LicenseCrawler on the command line. To view the available commands available for use on the command line, select Help from the Help menu.

A dialog box displays listing the available commands and examples of using LicenseCrawler on the command line with the commands. Click OK at the bottom of the dialog box to close it.

To close LicenseCrawler, click Exit.

If you don’t want to encrypt the file you save containing your license keys and serial numbers, you can save it as a plain text file. However, if you chose to save your license keys and serial numbers in a plain, unencrypted text file, we recommend you encrypt the data another way to secure your license keys.
There are ways of encrypting the file or the information after it’s saved. You can encrypt the text file using a tool called Omziff (see our post, Encrypt and Password Protect Text Files for Free), or you can copy and paste the text from the file into a LockNote file (see our post, Secure Private Information with Text Files in Windows).
If you copy and paste the information into a separate LockNote file, make sure you securely delete the unencrypted file using a tool like Omziff, File Shredder (see our two-part post, Securely Delete Files Using a Free File Shredder Tool – Part I and Securely Delete Files Using a Free File Shredder Tool – Part II), or DeleteOnClick (see our post, Securely Delete Files Using the Context Menu in Windows).


No comments:
Post a Comment