
Like a lot of applications these days, Audio Recorder has a personal package archive (PPA), although that is for Ubuntu users only. To use it, first open a Terminal.
Then type the following:
sudo apt-add-repository ppa:osmoma/audio-recorder
This will add the PPA to your list of sources. Then type the following:
sudo apt-get update
This command updates your software lists, so your package manager is now aware of the new PPA and its contents. To install it, simply type:
sudo apt-get install audio-recorder
Note: you can, of course, also grab source code from here and compile Audio Recorder manually on systems other than Ubuntu.
In addition to the main program, you’ll potentially need to install one or more libraries to enable audio recording (if they’re not already installed on your system).
gstreamer0.10-plugins-base (OGG)
gstreamer0.10-plugins-good (WAV and FLAC)
gstreamer0.10-plugins-ugly
gstreamer0.10-plugins-ugly-multiverse (MP3)
gstreamer0.10-plugins-bad
gstreamer0.10-plugins-bad-multiverse (AAC and M4A)
As the project page points out, the Fluendo MP3 GStreamer plugin only allows playback of MP3 files, so the “ugly-multiverse” plugin is requires if MP3 recording is what you want. Any of those libraries may be installed with the same command used to install Audio Recorder, simply by substituting the gstreamer library for it, like so:
sudo apt-get install gstreamer0.10-plugins-ugly-multiverse
Up pops a single window.
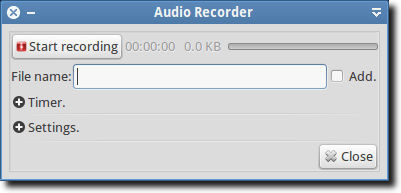
Here you’ll see a simple Start recording button, as well as a field to input the name of the file you want to record. You can give your new recording a name or Audio Recorder will give it a name, based on the date and time. By default your recordings will come out using this naming pattern:
rec-%C%y%m%d-%H:%M:%S
What that will produce is a file with the full date (YYYYMMDD) followed by the time of the recording using hours, minutes and seconds. You can also input a name, as mentioned, which is helpful for when you have a series of recordings to do, and don’t want to have to track down the one you want later. There is also a help page available (by choosing the Additional settings button), which gives you dozens of other naming options.
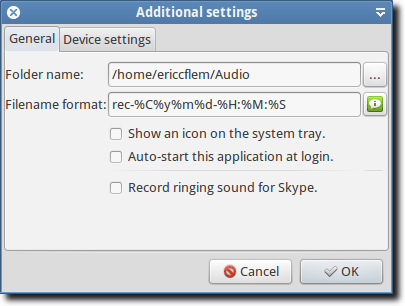
Note: on that same tab, you also control the default save directory, as well as other options such as whether to show a system tray icon, whether to start Audio Recorder at system startup, as well as if “ringing” should be recorded when recording through Skype (discussed later). The second tab shows more detailed options for various recording devices.
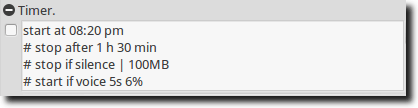
Back on the main window, there are two other options, accessible by clicking Timer or Settings. The Timer option allows you to set Audio Recorder to start and stop, not only at a certain time, but under certain conditions (such as the audio stream disappearing, the file size becoming too large, or the audio becoming too quiet).
Under the Settings option you have two choices. First, you have control over which audio source is used by Audio Recorder.
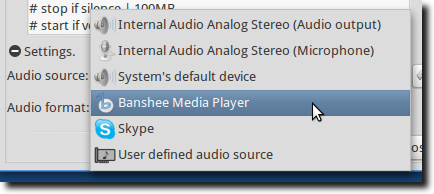
As you can see, not only can you choose standard inputs such as the audio from the soundcard or coming into your computer via the microphone, but you’ll notice Skype and Banshee are listed. Audio Recorder is aware of those programs (and others such as Rhythmbox and Amarok, but as they weren’t installed on this particular computer, weren’t shown in the list), and when that program is selected from the audio source list, will automatically be launched.
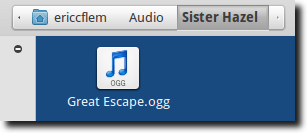
In addition, when recording from one of those known programs, Audio Recorder will record only when that computer is using your computer’s sound system. And, the file will be named appropriately, so if you were listening to a song in Banshee, you’ll find the recording in a folder named after the performer, and the recording will be whatever song you were listening to.
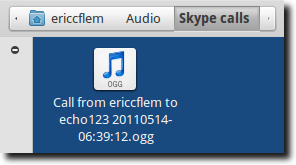
Similarly, if using Skype the name of the file will represent what was going on, such as “Call from ericcflem to…” (or whatever). This is true unless you provide a custom name.
In addition to the name of the file, you will also need to set up where it is to be saved (covered earlier), and of course the audio codec the recording will use (although you don’t actually have to do this, as Audio Recorder will save your files to an Audio directory in your Home folder, and will use 160 Kbps OGG as the audio default). Depending on what GStreamer plugins you have installed, you’ll likely have some or all of the following options: OGG, M4A, FLAC, MP2, MP3, WAV and SPX. This will vary, of course.

Once you’ve made your selection, it’s time to record. From the main window, simply click the Start Recording button at the top, and the recording will commence. You’ll see three pieces of information as the audio records: the time elapsed, the size of the audio file, and the level of the audio being recorded.

To quit recording, click the same button (which changed to Stop Recording after you initialized a new recording session), and you’re finished. Or that button can be used to pause recording. If you check the Add checkbox to the right of the file name field, any additional recording you perform will, instead of creating a new file, be added to the original. This is a nice feature, and worked very well during testing.
And that’s pretty much it. At the moment, the only real quibble is the inability, through Audio Recorder, to isolate the sound from a particular program, unlike a program for Mac OS X called Audio Hijack Pro.
Using Audio Hijack Pro, if you want to record only the audio from Quicktime Player, you can “hijack” that program and while it is being recorded, you can use other programs without interfering with the recording.
With Audio Recorder, even if you select Skype or Banshee as the source, the sound from other programs (such as YouTube videos or audio playing in the background while making a Skype call), will end up on the recording as well. So Audio Recorder isn’t perfect, true enough. But if you’re looking for a solid upgrade from the default Gnome Sound Recorder, it’s a fantastic choice.
Then type the following:
sudo apt-add-repository ppa:osmoma/audio-recorder
This will add the PPA to your list of sources. Then type the following:
sudo apt-get update
This command updates your software lists, so your package manager is now aware of the new PPA and its contents. To install it, simply type:
sudo apt-get install audio-recorder
Note: you can, of course, also grab source code from here and compile Audio Recorder manually on systems other than Ubuntu.
In addition to the main program, you’ll potentially need to install one or more libraries to enable audio recording (if they’re not already installed on your system).
gstreamer0.10-plugins-base (OGG)
gstreamer0.10-plugins-good (WAV and FLAC)
gstreamer0.10-plugins-ugly
gstreamer0.10-plugins-ugly-multiverse (MP3)
gstreamer0.10-plugins-bad
gstreamer0.10-plugins-bad-multiverse (AAC and M4A)
As the project page points out, the Fluendo MP3 GStreamer plugin only allows playback of MP3 files, so the “ugly-multiverse” plugin is requires if MP3 recording is what you want. Any of those libraries may be installed with the same command used to install Audio Recorder, simply by substituting the gstreamer library for it, like so:
sudo apt-get install gstreamer0.10-plugins-ugly-multiverse
Using Audio Recorder
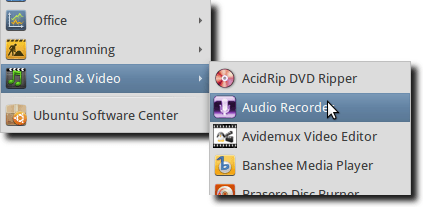
Once you’ve installed Audio Recorder, you can activate it by selecting it in the Applications menu, under Sound & Video.Up pops a single window.
Here you’ll see a simple Start recording button, as well as a field to input the name of the file you want to record. You can give your new recording a name or Audio Recorder will give it a name, based on the date and time. By default your recordings will come out using this naming pattern:
rec-%C%y%m%d-%H:%M:%S
What that will produce is a file with the full date (YYYYMMDD) followed by the time of the recording using hours, minutes and seconds. You can also input a name, as mentioned, which is helpful for when you have a series of recordings to do, and don’t want to have to track down the one you want later. There is also a help page available (by choosing the Additional settings button), which gives you dozens of other naming options.
Note: on that same tab, you also control the default save directory, as well as other options such as whether to show a system tray icon, whether to start Audio Recorder at system startup, as well as if “ringing” should be recorded when recording through Skype (discussed later). The second tab shows more detailed options for various recording devices.
Back on the main window, there are two other options, accessible by clicking Timer or Settings. The Timer option allows you to set Audio Recorder to start and stop, not only at a certain time, but under certain conditions (such as the audio stream disappearing, the file size becoming too large, or the audio becoming too quiet).
Under the Settings option you have two choices. First, you have control over which audio source is used by Audio Recorder.
As you can see, not only can you choose standard inputs such as the audio from the soundcard or coming into your computer via the microphone, but you’ll notice Skype and Banshee are listed. Audio Recorder is aware of those programs (and others such as Rhythmbox and Amarok, but as they weren’t installed on this particular computer, weren’t shown in the list), and when that program is selected from the audio source list, will automatically be launched.
In addition, when recording from one of those known programs, Audio Recorder will record only when that computer is using your computer’s sound system. And, the file will be named appropriately, so if you were listening to a song in Banshee, you’ll find the recording in a folder named after the performer, and the recording will be whatever song you were listening to.
Similarly, if using Skype the name of the file will represent what was going on, such as “Call from ericcflem to…” (or whatever). This is true unless you provide a custom name.
In addition to the name of the file, you will also need to set up where it is to be saved (covered earlier), and of course the audio codec the recording will use (although you don’t actually have to do this, as Audio Recorder will save your files to an Audio directory in your Home folder, and will use 160 Kbps OGG as the audio default). Depending on what GStreamer plugins you have installed, you’ll likely have some or all of the following options: OGG, M4A, FLAC, MP2, MP3, WAV and SPX. This will vary, of course.
Once you’ve made your selection, it’s time to record. From the main window, simply click the Start Recording button at the top, and the recording will commence. You’ll see three pieces of information as the audio records: the time elapsed, the size of the audio file, and the level of the audio being recorded.
To quit recording, click the same button (which changed to Stop Recording after you initialized a new recording session), and you’re finished. Or that button can be used to pause recording. If you check the Add checkbox to the right of the file name field, any additional recording you perform will, instead of creating a new file, be added to the original. This is a nice feature, and worked very well during testing.
And that’s pretty much it. At the moment, the only real quibble is the inability, through Audio Recorder, to isolate the sound from a particular program, unlike a program for Mac OS X called Audio Hijack Pro.
Using Audio Hijack Pro, if you want to record only the audio from Quicktime Player, you can “hijack” that program and while it is being recorded, you can use other programs without interfering with the recording.
With Audio Recorder, even if you select Skype or Banshee as the source, the sound from other programs (such as YouTube videos or audio playing in the background while making a Skype call), will end up on the recording as well. So Audio Recorder isn’t perfect, true enough. But if you’re looking for a solid upgrade from the default Gnome Sound Recorder, it’s a fantastic choice.
No comments:
Post a Comment