
SnagIt is likely the most popular screen capture utility on the market, it’s versatile, has plenty of features and is easy to use. One drawback to using it though is when you have a lot of images you want to capture and place in a document or for posting on a web site, and you need the images to be resized.
With SnagIt, ver 10, you have to click Image, then Resize, then Resize Image… then click the bubble next to where it says Scale to specific size (pixels), then finally, input the width you want. After several files, this grows tedious; enter AutoHotKey, a free utility that allows you capture keystrokes and then do something based on those keystrokes.
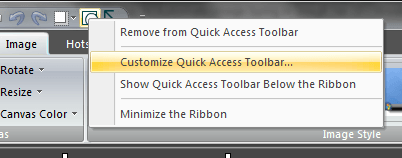
To begin, before you even download AutoHotKey, first take advantage of SnagIt’s ability to assign keystroke commands. First right-click on the Quick Access Menu, to get this dropdown:

Click on Customize Quick Access toolbar… to get this popup menu:

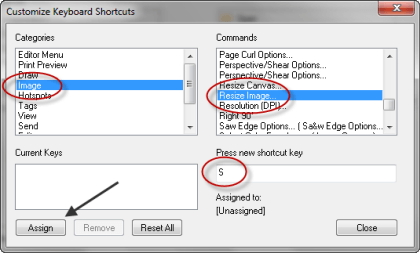
Scroll down under Categories and pick Images, then scroll down under Commands and pick Resize Image; then type an “s” in the box that says Press new shortcut key. Then, to make it happen, click the Assign button to make it happen. What this all does is make it so that this window pops up whenever you press the “s’ key:

That gets us most of the way there, but it would be nice if we could get it to go one step further and click the bubble next to Scale to specific size (pixels) for us too, because that’s what we need to do to find the current size or to resize it to something else; to do that, we need a hotkey utility program, and in this case, it’s AutoHotKey, the program you can download and use for free.
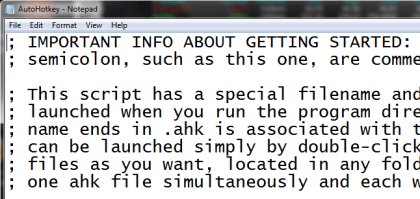
When you download and install AutoHotkey, the installation process creates a script file and opens it for you to use; it looks like this:

It has some initial code in it that you can ignore; instead, move down past the point where the lines start with semi-colons (these are comment lines) and type this:

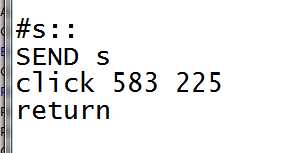
What this does is assign Win-s to the commands below it (Win-s means type the key on your keyboard with the Windows logo on it, then the letter “s’.
The commands below it instruct it to first send the letter s, because that utilizes the shortcut we just created above. Next, the command “click 583 225” causes the screen to be mouse clicked at screen position 583 225 which we got by running another program that comes with AutoHotKey, AutoIt3 WindowSpy.
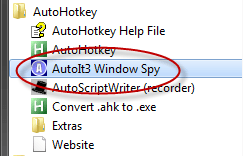
This works because Snagit always pops up the sizing window in the same place, if it pops up at a different location on your screen, you’ll need to go into your AutoHotKey Folder and run AutoIt3 WindowsSpy yourself from the Start button (after clicking on All Programs):

You’ll get a small popup window chock full of information which you can ignore for the moment. Instead, click on the SnagIt Editor to bring it up (the popup window should remain on top) then click once where you want to find your screen numbers, in this case on the bubble that says Scale to specific size (pixels):

Write down the screen coordinates (in the red circle) and put them in place of the coordinates in your script.
Then, all you have left to do is save the script to your hard drive, then run it by clicking on your Start button , the double-clicking on this:

Note: For the script to run correctly, you have to have the SnagIt Editor open in full screen mode, ready for use.
The script should execute when you press Win-s, bringing up your Resize Image PopUp window with the bubble next to Scale to specific size (pixels) checked.
With SnagIt, ver 10, you have to click Image, then Resize, then Resize Image… then click the bubble next to where it says Scale to specific size (pixels), then finally, input the width you want. After several files, this grows tedious; enter AutoHotKey, a free utility that allows you capture keystrokes and then do something based on those keystrokes.
To begin, before you even download AutoHotKey, first take advantage of SnagIt’s ability to assign keystroke commands. First right-click on the Quick Access Menu, to get this dropdown:
Click on Customize Quick Access toolbar… to get this popup menu:
Scroll down under Categories and pick Images, then scroll down under Commands and pick Resize Image; then type an “s” in the box that says Press new shortcut key. Then, to make it happen, click the Assign button to make it happen. What this all does is make it so that this window pops up whenever you press the “s’ key:

That gets us most of the way there, but it would be nice if we could get it to go one step further and click the bubble next to Scale to specific size (pixels) for us too, because that’s what we need to do to find the current size or to resize it to something else; to do that, we need a hotkey utility program, and in this case, it’s AutoHotKey, the program you can download and use for free.
When you download and install AutoHotkey, the installation process creates a script file and opens it for you to use; it looks like this:
It has some initial code in it that you can ignore; instead, move down past the point where the lines start with semi-colons (these are comment lines) and type this:
What this does is assign Win-s to the commands below it (Win-s means type the key on your keyboard with the Windows logo on it, then the letter “s’.
The commands below it instruct it to first send the letter s, because that utilizes the shortcut we just created above. Next, the command “click 583 225” causes the screen to be mouse clicked at screen position 583 225 which we got by running another program that comes with AutoHotKey, AutoIt3 WindowSpy.
This works because Snagit always pops up the sizing window in the same place, if it pops up at a different location on your screen, you’ll need to go into your AutoHotKey Folder and run AutoIt3 WindowsSpy yourself from the Start button (after clicking on All Programs):
You’ll get a small popup window chock full of information which you can ignore for the moment. Instead, click on the SnagIt Editor to bring it up (the popup window should remain on top) then click once where you want to find your screen numbers, in this case on the bubble that says Scale to specific size (pixels):
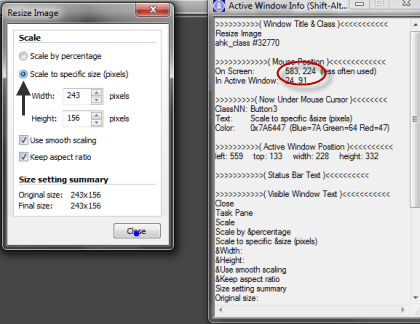
Write down the screen coordinates (in the red circle) and put them in place of the coordinates in your script.
Then, all you have left to do is save the script to your hard drive, then run it by clicking on your Start button , the double-clicking on this:
Note: For the script to run correctly, you have to have the SnagIt Editor open in full screen mode, ready for use.
The script should execute when you press Win-s, bringing up your Resize Image PopUp window with the bubble next to Scale to specific size (pixels) checked.
No comments:
Post a Comment