Showing posts with label Ubuntu. Show all posts

Control Your CPU Speed From the Ubuntu Indicator Applet

If you’re a regular, on-the-go user of a laptop, one of your main concerns is likely battery life.  The longer your device can go without needing to be recharged, the better off you are.  And one of the things that drains battery life more quickly is when your computer runs its CPU at full speed.
There are, of course, things you can do to extend battery life.  Turning off your wireless card works, as does dimming the display.

But if you just want an easily accessible tool that allows you – at a moment’s notice – to tweak your CPU to a specific frequency, or to set the mode it uses, then Indicator-CPUfreq is a nice place to start.
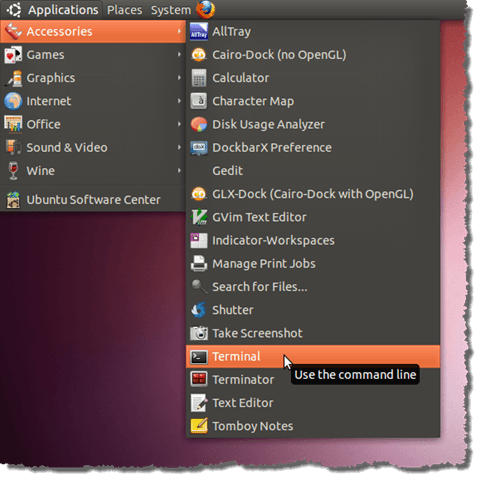
To install it, first open a Terminal.
Open Terminal

Taking Screenshots in Linux with Shutter

In the past, we’ve discussed different ways to take screenshots from the Terminal in Linux.  Linux, whether using GNOME, KDE or Xfce, also comes with GUI methods for taking screenshots.  GNOME has gnome-screenshot (called Take Screenshot in the menus), KDE has KSnapshot, and Xfce offers both the standard Screenshooter application and a panel plugin.  These offerings are all well and good, but are all fairly basic.  While Mac and Windows users can take advantage of any number of screenshot utilities offering more advanced features, Linux users have been left out in the cold.
Until Shutter came along, that is.  Shutter is a screenshot tool that all Linux users can take advantage of, offering not only the ability to take full Desktop screenshots, but single window, menu, tooltip and selection-based screenshots as well.  Shutter can also act as a very capable screenshot editor, and when you’re done, can be used to upload your image to a variety of web hosts.

Give Your Ubuntu Installation Full Multimedia Support

Adding support for a wide range of formats, codecs and media in Linux can be a bit daunting.  There are numerous playback engines (Xine, MPlayer, GStreamer, VLC), which can be confusing.  And since Linux – by its very nature – favors open solutions, you often have an operating system that often doesn’t have much out-of-the-box support for some common multimedia formats.
What formats are we talking about?  Well, a default installation of Ubuntu can’t play any of your MP3s.  It can’t play videos on Hulu or YouTube.  It can’t play the Divx file you downloaded off the Internet, and it can’t play your store-bought DVD disks.  Linux can play them, but because some are restricted by patent or licensing issues (which vary from country to country), many Linux distributions simply forego support in any of their versions.  This can be both tedious and annoying.

Setting Up Our Repositories

Ubuntu uses four basic repositories: main, restricted, universe and multiverse.  Each houses software with either different levels of support from Ubuntu, or different licenses.  Since a lot of the software we’ll be installing is in the universe and multiverse repositories (which are turned off by default), we’ll need to turn them on.
In Ubuntu, we can do this first part graphically (although the Terminal will be far superior for actually installing the rest of the software), by going to the Software Sources preference pane.  You can find Software Sources in the System Menu, then the Administration submenu.

Reinstall Your Ubuntu Apps After A Fresh Reinstall

If you’re the type of person who is constantly installing, modifying, deleting and reinstalling a lot of different operating systems, then you know the pain of having to download and install the programs you want to use, each time you do this.
The drill is simple, but tedious: wipe the hard drive, install the new operating system, download all the programs you use and install them.  Then, days or weeks or months later, do it all over again when you find a new operating system you want to use!

If you use Ubuntu, however, there is a simple solution to this problem.  You’ll still need to download and install everything “extra” you had on your previous installation, but you won’t need to remember exactly what it was.
You can automate the process with just a few clicks.  This is thanks to Synaptic Package Manager, which offers the ability to export lists of packages currently installed on your computer; these lists are called Markings.  It’s a simple process, but one that should save you a lot of time.

Use MSStyles to Theme Wine Applications In Linux

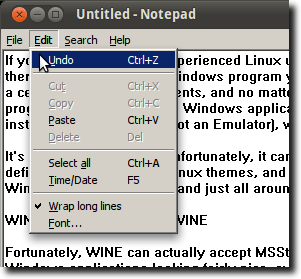
Notetab Without MSStyleIf you’re a new, or even experienced Linux user, chances are pretty good that no matter how hard you try, there is always that one Windows program you need.  Maybe it’s for work.  Often a business will mandate a certain format for documents, and no matter how good it is, or how comfortable you might be in a native Linux program, you still need the Windows application.  So instead of installing Windows alongside Linux, you installed Wine (Wine Is Not an Emulator), which allows you to run Windows programs from within Linux.

Upgrade Ubuntu Using the Alternate CD

The Alternate CD is different from the standard Desktop CD.  The standard CD allows users to try out Ubuntu without installing, while the Alternate CD only offers a text-based installer.  To find it, go to the Ubuntu download page.
Ubuntu Download Page

New in Ubuntu Natty Part 2 – Lenses, Shortcuts & More


Lenses, as mentioned in part one of this series, are a specialized way of viewing your applications and documents.  By default, there are two lenses already on the Unity launcher; they’re located near the bottom, just above the trash can.  The first is for Applications, the other for Files & Folders.  Clicking on one of them reveals that lens in the Dash.
Applications Lens in the Dash

Installing flash player in Ubuntu

If you have been following my series of posts on how to install Ubuntu on Microsoft Virtual PC 2007 then you most likely have Ubuntu up and running, but have you wondered how to install applications on Ubuntu? It is quite different than the way we install applications in window.
Go to youtube or any other website that requires a flash player and you will see that you need to install the flash player in order to play the videos. Go how to you install the flash player in Ubuntu?

Simple.

Close the browser, and go to Applications, Accessories, Terminal and type the following command:
$ sudo apt-get install flashplugin-nonfree
After a few seconds the flash player should be installed on your computer. Return to youtube or any other website that requires a flash player, and the videos should display find now.

Change Ubuntu’s Update Alerts for Fewer Distractions

In Ubuntu, thanks to the Update Manager, it is incredibly simple to keep track of available updates.  The Update Manager is scheduled to start every time your computer does, and it regularly checks to see if any new pieces of installed software have been updated.  If so, it automatically starts, and shows you all available updates.
Available Updates


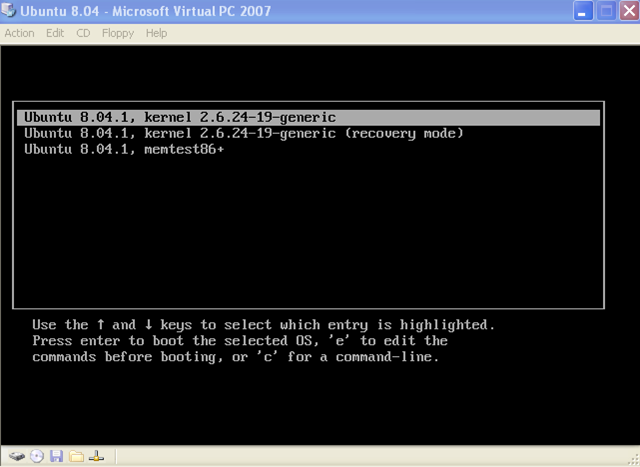
Error when booting Ubuntu in Virtual PC the first time

Ubuntu boot menu
When booting Ubuntu, press the Esc key when the GRUB loading is displayed. You should get 3 boot options menu:

Perform a Zero Fill Using a Linux Live CD

Download and Burn a Ubuntu Image

1. Load the Ubuntu web site, and then click on Download Ubuntu.
2. Select your Download location from the drop-down menu, and click Begin Download.
Ubuntu Download Page

Another Drop-Down Terminal Window for Ubuntu

We have previously written about a drop-down terminal window available for Ubuntu called Guake (see our post, Install a Drop-Down Terminal Window in Ubuntu). We found another drop-down terminal window for Ubuntu, called Tilda, that is easy to install and use.
To install Tilda, open a Terminal window by selecting Accessories | Terminal from the Applications menu.

Opening a Terminal window